

.png)
Kinetix Emote SDK
Kinetix SDK enables game studios to:
- Integrate an AI User-Generated Emote feature for their players to create custom emotes from a simple video directly in-game.
- Access a library of 1000+ Emotes and tools to integrate them in their game progressively (daily, weekly, etc.). Enhance socialization in your game with no effort from your teams (no content production nor integration in game needed). The Emote library is continuously updated with trendy moves.
Kinetix Unity Package URL:
To download Kinetix Unity package, copy and paste the Git URL below in Unity’s Package Manager: https://github.com/git-kinetix/kinetix-unity-sdk-packagemanager.git
You can also download our package on Unity Asset Store at the URL below: https://assetstore.unity.com/packages/tools/generative-ai/kinetix-emote-sdk-258551#description
Installation
1. Sign up to Developer Portal to generate your Game API Key and start leveraging Kinetix Emote infrastructure.
2. Make sure you have downloaded and installed Unity 2020.3.0f1 LTS or later.
3. You will need Git to be installed to fetch the Unity packages through the Unity Package Manager.
4. Dependencies are not included in Unity’s Package. You can import them from Window > Package Manager and Add Package from git URL.
- Newtonsoft (Compatible with any version) [com.unity.nuget.newtonsoft-json]
- Input System [com.unity.inputsystem]. As our UI uses new Input system, verify that your "Active Input Handling" is set to "Input System Package (New)" or "Both" in "Edit/Project Settings/Player/Other Settings/Configuration"
5. Lastly, import TMP Essential ressources by clicking on "Window/TextMeshPro/Import TMP Essential Ressources"
6. Open your Unity Project.
Requirements
- Ready Player Me SDK
- Newtonsoft (Compatible with any version) [com.unity.nuget.newtonsoft-json]
- Input System [com.unity.inputsystem]. As our UI uses new Input system, verify that your "Active Input Handling" is set to "Input System Package (New)" or "Both" in "Edit/Project Settings/Player/Other Settings/Configuration"
Getting Started
Getting Started with ReadyPlayerMe to load an avatar: https://docs.readyplayer.me/ready-player-me/integration-guides/unity/quickstart
Getting Started with Kinetix to play an Emote:
- First, ensure that you have copy your Game API Key from the Developer Portal and installed all dependencies from previous section.
- Open your Unity project and open the Unity Package Manager Window on "Window > Package Manager".
- In the Package Manager window click on the " + " icon in the top left corner and select Add Package From Git URL. Paste in this URL and click "Add":
https://github.com/git-kinetix/kinetix-unity-sdk-packagemanager.git - In the Kinetix window, click on Package Manager.
- Click on "Install Core Bundle" for the Web2 Bundle. This process will install the Core, UICommon and UIEmoteWheel Packages.
On Unity 2020.x versions specifically, you may have an issue starting with :
Error: Could not load signature of Kinetix.Internal.Retargeting.Utils.CustomTransformLogger:DrawSkeleton due to: Could not load file or assembly 'Kinetix.Internal.Utils
If this happens, you can reimport the Kinetix Core Package by right clicking on "Kinetix Core" in "Packages" and select "Reimport". - Verify the packages are installed in the Unity Package Manager. You can now click on the package "Kinetix UI Emote Wheel" and get the Emote Wheel Samples by clicking on "Import" in "Samples".
- Open the "QuickStart" sample from "QuickStart" sample folder.
- Click on "SampleScript" and put your Game API Key in the Inspector.
- Play and enjoy the Emotes!
Additional informations on how to play Emotes on ReadyPlayerMe Avatars:
- Open ReadyPlayerMe’s Quickstart Scene in Samples > Ready Player Me Core > [version] > QuickStart.
- In the Hierachy on the left, drag and drop the PreviewAvatar into Kinetix’s QuickStart sample folder. Click on “Original Prefab” to create a Prefab.
- In the Kinetix’s QuickStart Scene, drag and drop the PreviewAvatar you have just imported into the scene. For a better experience, you can change Rotation > Y to 180 in order to rotate the ReadyPlayerMe Avatar in front of the camera.
- Click on “SampleScript” and change the Local Player Avatar parameter to the PreviewAvatar in the scene.
- Play and enjoy the Emotes on your avatar!
Links
- Website: https://www.kinetix.tech/
- GitHub Repository: https://github.com/git-kinetix/kinetix-unity-sdk-packagemanager
- Documentation: https://docs.kinetix.tech/integration/integrate-kinetix-sdk/sdk-integration-in-unity
- Unity Asset Store Link: https://assetstore.unity.com/packages/tools/generative-ai/kinetix-emote-sdk-258551#description
Kinetix Unreal Package URL:
Here’s the GIT repo to clone to get the Kinetix Unreal SDK : https://github.com/git-kinetix/kinetix-sdk-unreal
Kinetix Installation
- Sign up to Developer Portal to generate your Game API Key and start leveraging Kinetix Emote infrastructure.
- Make sure you have downloaded and installed Unreal Engine 5.2 or later.
- Be sure that you have Visual Studio 2022 (also works with 2019 but will be deprecated in 5.3 and removed in 5.4).
- You will need Git to be installed to clone the project.
Open your versioning application and clone the following repository inside a "Plugins" folder of your UE’s project (you may have to create it yourself) from the URL below:
https://github.com/git-kinetix/kinetix-sdk-unreal.git
If you’re using Git from the command line, you can add "--depth 1" to your command to reduce the fetch's size:
git clone <https://github.com/git-kinetix/kinetix-sdk-unreal.git> . --depth 1
- In the same folder, clone the glTFRuntime project from the URLs below:
https://github.com/rdeioris/glTFRuntime.git - Once the project is cloned, open it. It will ask you to build the missing modules. Select "Yes".
RPM Installation:
https://docs.readyplayer.me/ready-player-me/integration-guides/unreal-engine/quickstart
Getting Started
Getting Started with Kinetix & RPM to play an Emote in the wheel from your RPM Avatar:
1. First, ensure that you have copy your Game API Key from the Developer Portal.
2. Initialize the SDK with parameters in the KinetixCoreConfiguration available in Edit → Project Settings → Game → Kinetix Settings. https://docs.kinetix.tech/integration/integrate-kinetix-sdk/sdk-integration-in-unreal-engine/sdk-core-modules-activation-unreal
3. Add a way to connect your user via a unique UserId: Account Management
4. Prepare the RPM Character for Emote playing for Animation by following:
4.1. To load the avatar, open ReadyPlayerMe Content/QuickStart/Blueprint/BP_RPM_Character.

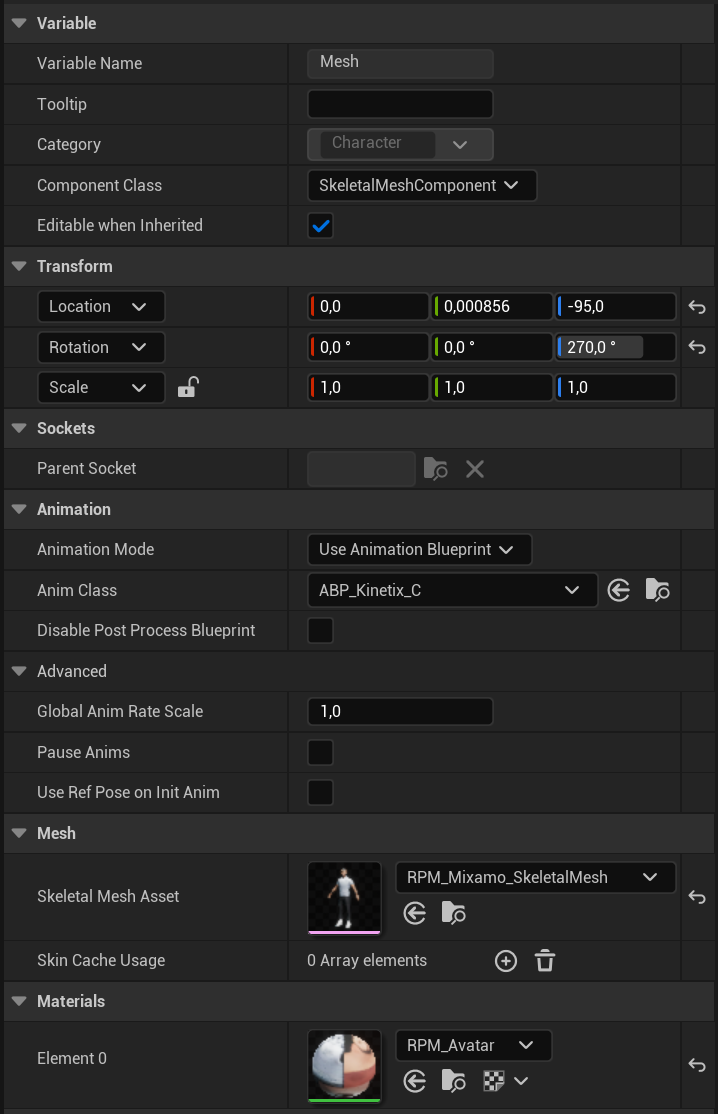
4.2. Inside the new opened window, add a SkeletalMesh and call it "SkeletalMeshTarget".

4.3. Attach it to the inherited "Mesh (CharacterMesh0)"
4.4. Due to the fact that "Mesh (CharacterMesh0)" is inherited from Character class, we need to copy its values (except the transform ones) into the newly added "SkeletalMeshTarget". Make sure you have selected the RPM_Mixamo_SkeletalMesh from Kinetix’s path.
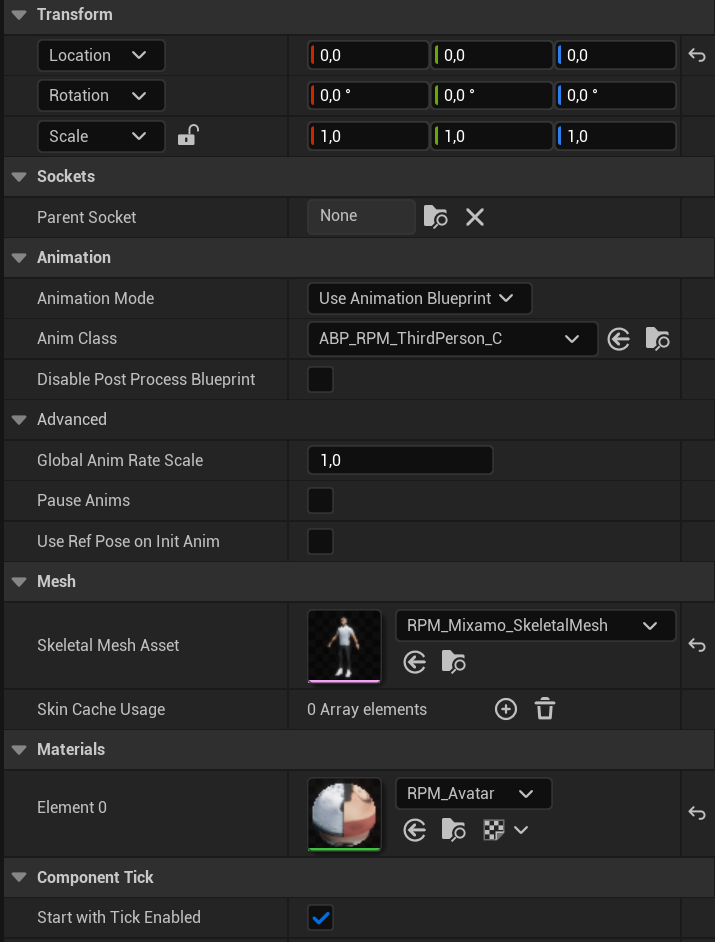
4.5. Replace the values of "Mesh (CharacterMesh0)" with the values below.
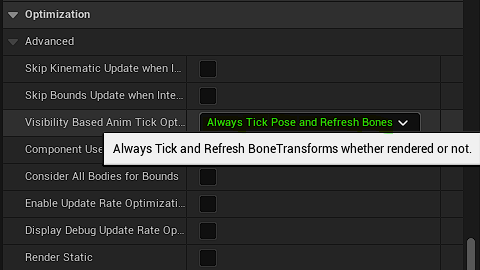
4.6. Make sure you have unchecked Visible’s tickbox in Rendering, and to select Visibility based Anim Tick Option with Always Tick and Refresh BoneTransforms whether rendered or not.

4.7. Add a "KinetixCharacterComponent" and a "AnimSequenceSamplerComponent" to the ThirdPersonTemplate in Components > Add.
5. To set up the retargeter:
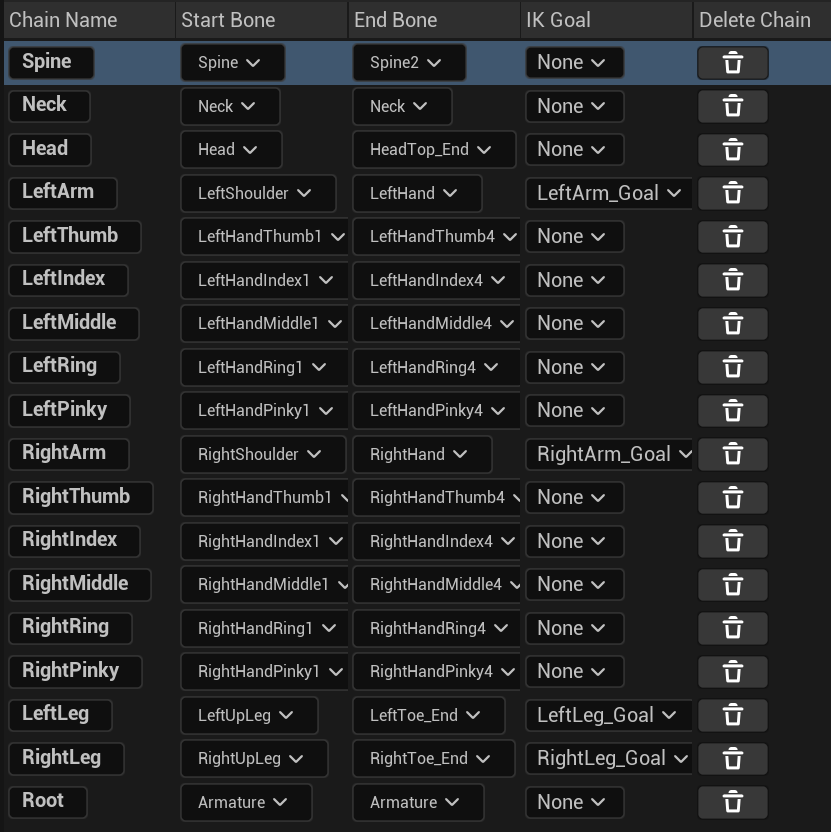
5.1. Go to Ready Player Me Content/Character/Fullbody/Mesh and right click to create Animation > IK Rig > IK Rig. We called it IK_RPM_Mixamo.

5.2. We setup the IK Rig like this:
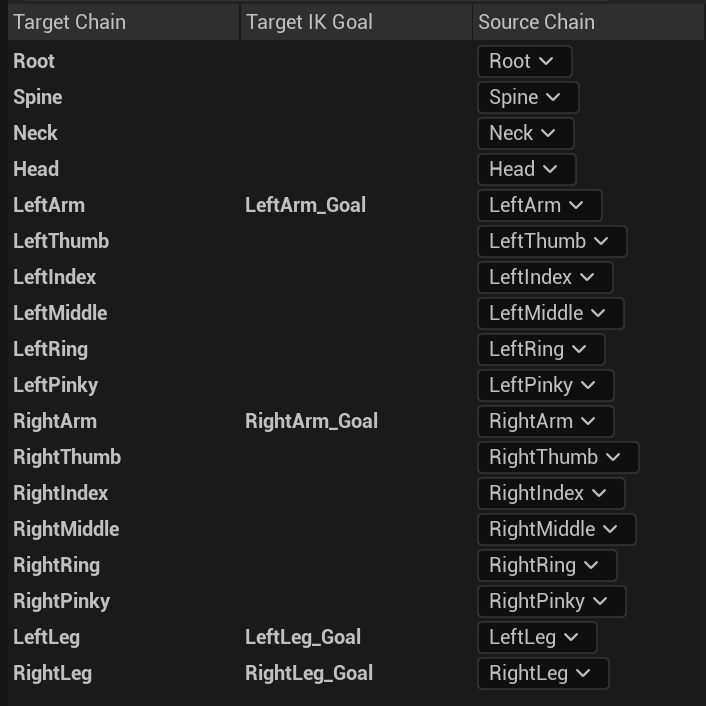
5.3. Now, create Animation > IK Rig > IK Retargeter. We called it RTG_RPM_Mixamo. As Source IK Rig, select IK_RPM. As Target IK_Rig, select IK_RPM_Mixamo. We configured the IK Retargeter like this:
6. Now to finish the modifications to be able to play Emotes:
6.1. Open the Animation Blueprint "ABP_RPM_ThirdPerson" in Ready Player Me Content/QuickStart/Animations.
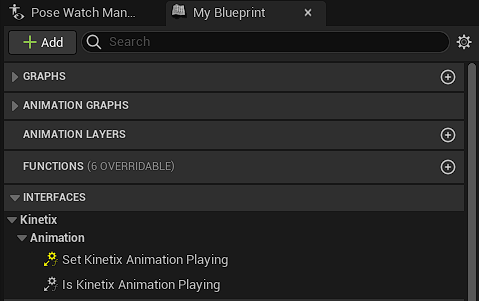
6.2. Click on "Class Settings". Inside the "Interfaces" section. Add the "KinetixAnimationInterface" to it.

6.3. With this interface comes 1 function and 1 event, implement them by double clicking on each one.
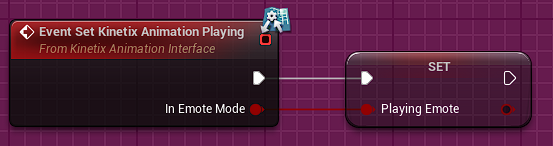
6.4. Keep the result of the event "SetKinetixAnimationPlaying" in a variable:
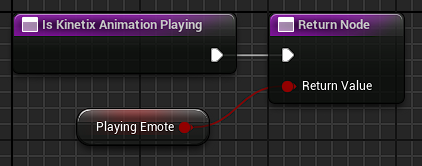
6.5. In "IsKinetixAnimationPlaying", return the "PlayingEmote" variable:
6.6. In the "AnimGraph", add a CachePose (we called it here "GameplayPose"):

6.7. Add a "Blend Poses By bool" node, connect the "PlayingEmote" boolean value to its "Active Value". Add a "Retarget Pose From Mesh" node, connect it to its "True Pose". Add a "Use cached pose "GameplayPose" node and connect it to its "False Pose". Finally, connect the output of the "Blend Poses by bool" to the global "Output Pose" node:
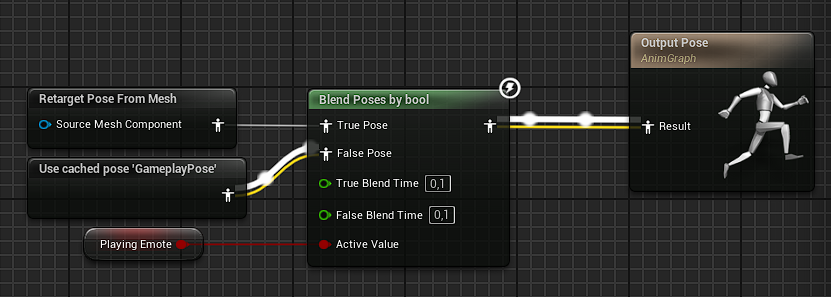
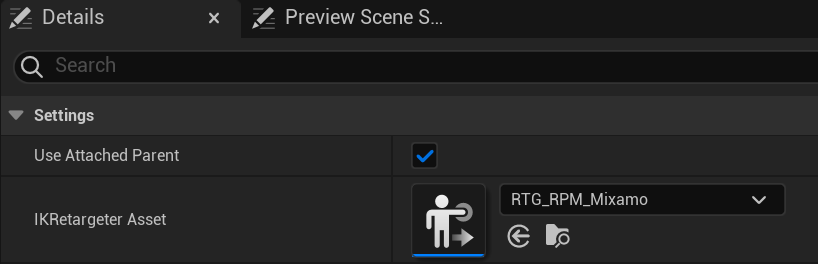
6.8. Click on the "Retarget Pose From Mesh" node and set the "IK_Retargeter Asset" value to "RTG_RPM_Mixamo":
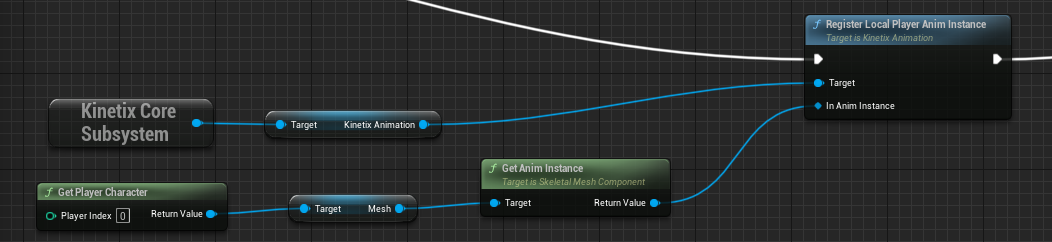
6.9. You can now use this circuit in BP_RPM_Character to register your local pawn as the local player avatar:
6.10. Set the SkeletalMeshComponent “Target” as the one the RPM component should use:
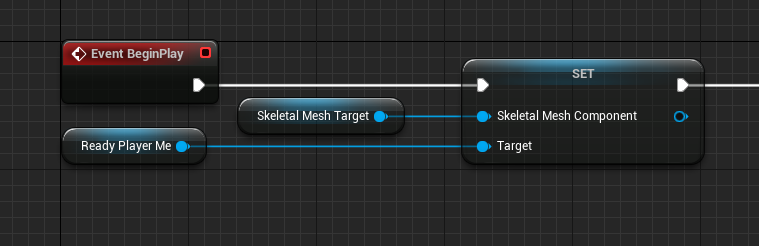
6.11. Launch the loading of your avatar (in case the field is empty due to the fact that the AnimInstance is created only when a Skeletal Mesh is present)
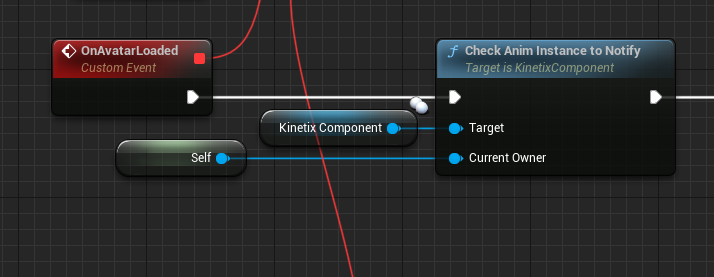
6.12. Once the avatar is loaded and ready to go, ask for a refresh of the AnimInstance to use:
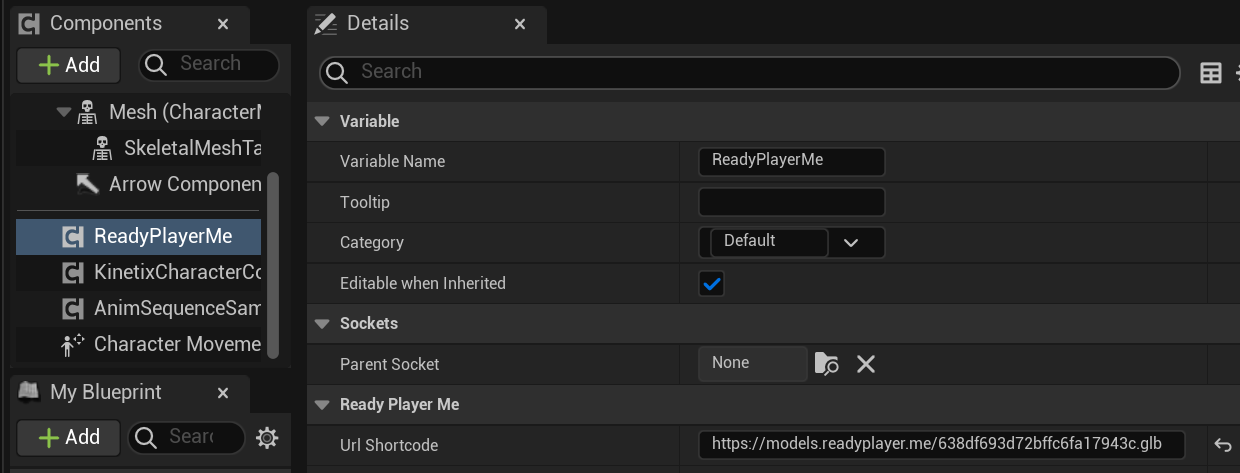
7. Finally, click on Ready Player Me Component and add your desired Url or shortcode
8. You can follow the instructions on Emote Wheel UI, using the BP_RPM_Character to implement the nodes.
9. Play and enjoy the Emotes!
Links
- Website : https://www.kinetix.tech/
- GitHub Repository : https://github.com/git-kinetix/kinetix-sdk-unreal
- Documentation : https://docs.kinetix.tech/integration/integrate-kinetix-sdk/sdk-integration-in-unreal-engine