Build Your Custom Ready Player Me Avatar Creator in Unity SDK

Setup Ready Player Me Custom Avatar Creator SDK Package
Before adding the Creator package, make sure the Ready Player Me Core SDK package is already imported into your Unity Project. You can find more information on how to do this in the first step of the "Getting Started With Ready Player Me Integration in Unity" blog post.
To install the Avatar Creator package, follow these steps:
1. Visit the Ready Player Me Unity Avatar Creator SDK GitHub repository and copy the Git URL as shown in the image below.

Copy the Git URL of the Ready Player Me Avatar Creator SDK
2. In your Unity project, go to Window → Package Manager→ + Button. Then select Add package from Git URL from the menu, paste the copied URL into the provided field, and click the Add button.
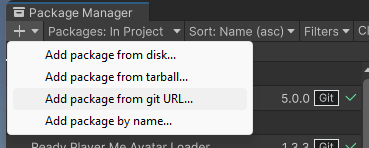
Add the package from the Git URL
The package will take a few seconds to import, and once it's complete, it will be ready for use.
Explore the Custom Avatar Creator SDK sample
After the package is installed, follow these steps to explore the Ready Player Me Avatar Creator sample in Unity:
- Select the package in the Package Manager.
- Go to the samples tab and find the AvatarCreatorExample.
- Click "Import."

Importing the Ready Player Me Avatar Creator Samples
Once imported, you'll notice a new folder named "Ready Player Me Avatar Creator" under the Samples folder within Assets. Within this folder, you can access the Scenes folder, where you'll find the scene example. Alternatively, you can search for "AvatarCreatorExample" in the Project search bar.
If you press play, you should be able to see the UI for the avatar customization, similar to what you find on Ready Player Me Avatar Creator website.

Avatar Creator Sample Avatar Creator Selection Screen
Now, let's take a look at how this is structured. On the hierarchy view, you can find the UI gameobject.

UI GameObject unfolded in the hierarchy for Avatar Creator Sample
This object holds the AvatarCreatorCanvas, which mainly contains the following UI elements:
The Screens GameObject holds all the screens that will be shown and hidden depending on the state. In this sample, the screens implemented mirror those of the Ready Player Me Avatar Creator website. However, you can customize them to match your UI and the level of customization you want to offer to users for their avatars. The screens are:
- Login With Email Selection: Allows users to log in by sending a one-time code to their email address.
- Avatar Selection: Permits users to select or edit previously created avatars from the list.
- Gender Selection: Allows users to choose the gender of their avatar.
- BodyType Selection: Enables users to select the avatar's body type (full-body or half-body).
- Default Avatar Selection: Permits users to select a default avatar from the list.
- Selfie Selection: Serves as a landing page for taking a selfie and using it to generate the avatar.
- Camera Photo Selection: Opens the webcam for taking a photo.
- Avatar Creator Selection: Serves as a landing page for avatar customization.
In the following section of this blog, we will focus on one of these screens, the AvatarCreatorSelection and its structure as an example.
- The Header GameObject holds the Logo, the Back button to go back to the previous screen and the Save button to save the final avatar.
- LoadingManager component manages the loading screens displayed during avatar loading or updating.

Avatar Loading screen

Updating Avatar Popup
- AccountCreationPopup appears when the next button is pressed after the avatar is finalized in the Avatar Creator Selection. If the user is signed in, this popup will not be shown.

Account Creation Popup
Now, you might wonder how we move from one screen to another and how all these states are handled?
If you select the UI gameObject, you will find the Avatar Creator State Machine script component attached. This component references the list of all the states. The State Machine's role is to ensure smooth transitions between different screen states based on user input.

Avatar Creator State Machine Script Component
The first property is the list of States To Skip, which allows the skipping of states. We also have a property to set the Starting State. The starting state defaults to the Avatar Selection screen if the user is logged in. The Default Body Type sets the default body type if the body type selection state is skipped. Finally, the Default Gender sets the default body type if the gender selection state is skipped.
In the scene, there's a GameManager game object, which contains the script responsible for loading avatars using the referenced Avatar Config and enabling/disabling the referenced Avatar Creator State Machine from the UI game object mentioned above.
AvatarCreatorSelection Screen breakdown
Let's focus on understanding the AvatarCreatorSelection screen and its structure. First, let's identify this screen visually. Refer to the image below for an overview of the different panels shown during the Avatar Creator screen.

Avatar Creator Selection Panels
- AssetTypes Panel contains buttons for different asset types, including face, hairstyle, outfit, glasses, face mask, face wear and headwear. When clicked, these buttons open the respective asset-type panel.
- AssetType Panel Prefab contains asset buttons for the selected asset type.
- FaceType Panel Prefab contains asset-type panels for the face, such as face shape, eyes, eyebrows, nose, mouth, beard, etc.
- Left AssetType Panel Prefab is used for asset types like eye color, skin color, hair color, etc.
As for the buttons, we have the following:
- AssetType Button Prefab used for selecting an asset type. The thumbnail image is located in the path Samples/Icons/AssetType.
You can also customize the assets by replacing the images with the ones you want to use instead.

AssetType Button Prefab
- Asset Button Prefab used for selecting an asset with a thumbnail and a selection circle. The thumbnail image is fetched from the server.
- Clear asset selection button allows you to clear the selected asset.

Clear asset selection button
As for scripts, If you select the AvatarCreatorSelection GameObject under UI → AvatarCreatorCanvas → Creator → Screens → AvatarCreatorSelection, you will see the three main script components attached to the gameObject:
- Category UI Creator
- Avatar Creator Selection
- Asset Button Creator
You can explore these scripts to gain a more in-depth understanding of how the Avatar Creator is built. This approach is one way to implement the Avatar Creator API, but remember that you can tailor your implementation based on your project's specific needs.
Let us know in the Ready Player Me Developers Forum if you have any questions. We would love to hear about how you integrated the avatars into your project. And feel free to suggest other topics you would like us to cover in future blog posts.
Get started with Custom Avatar SDK and Ready Player Me
Are you building an app or game that could use some avatars? You can integrate Ready Player Me for free, even in commercial applications. Sign up here to get started.