Integrating Ready Player Me Characters Into Diverse Game Art Styles Demo Using Shaders in Unity
.png)
In this blog post, we will explore how to accomplish this using Shaders in Unity. We’ll use the Toon Shader from Unity Asset Store as an example. You can apply the same process using other shaders, too. We will build a demo featuring an environment from the latest Unity URP Samples to show you how to load your Ready Player Me avatars with a different art style, both in the Unity Editor and during runtime.
Setup your environment in Unity
We will be using the new Universal Render Pipeline (URP) samples by Unity. Let’s get started with the Garden sample that you can access and download through this git repository. If you already have an environment that you would like to use, feel free to do so.
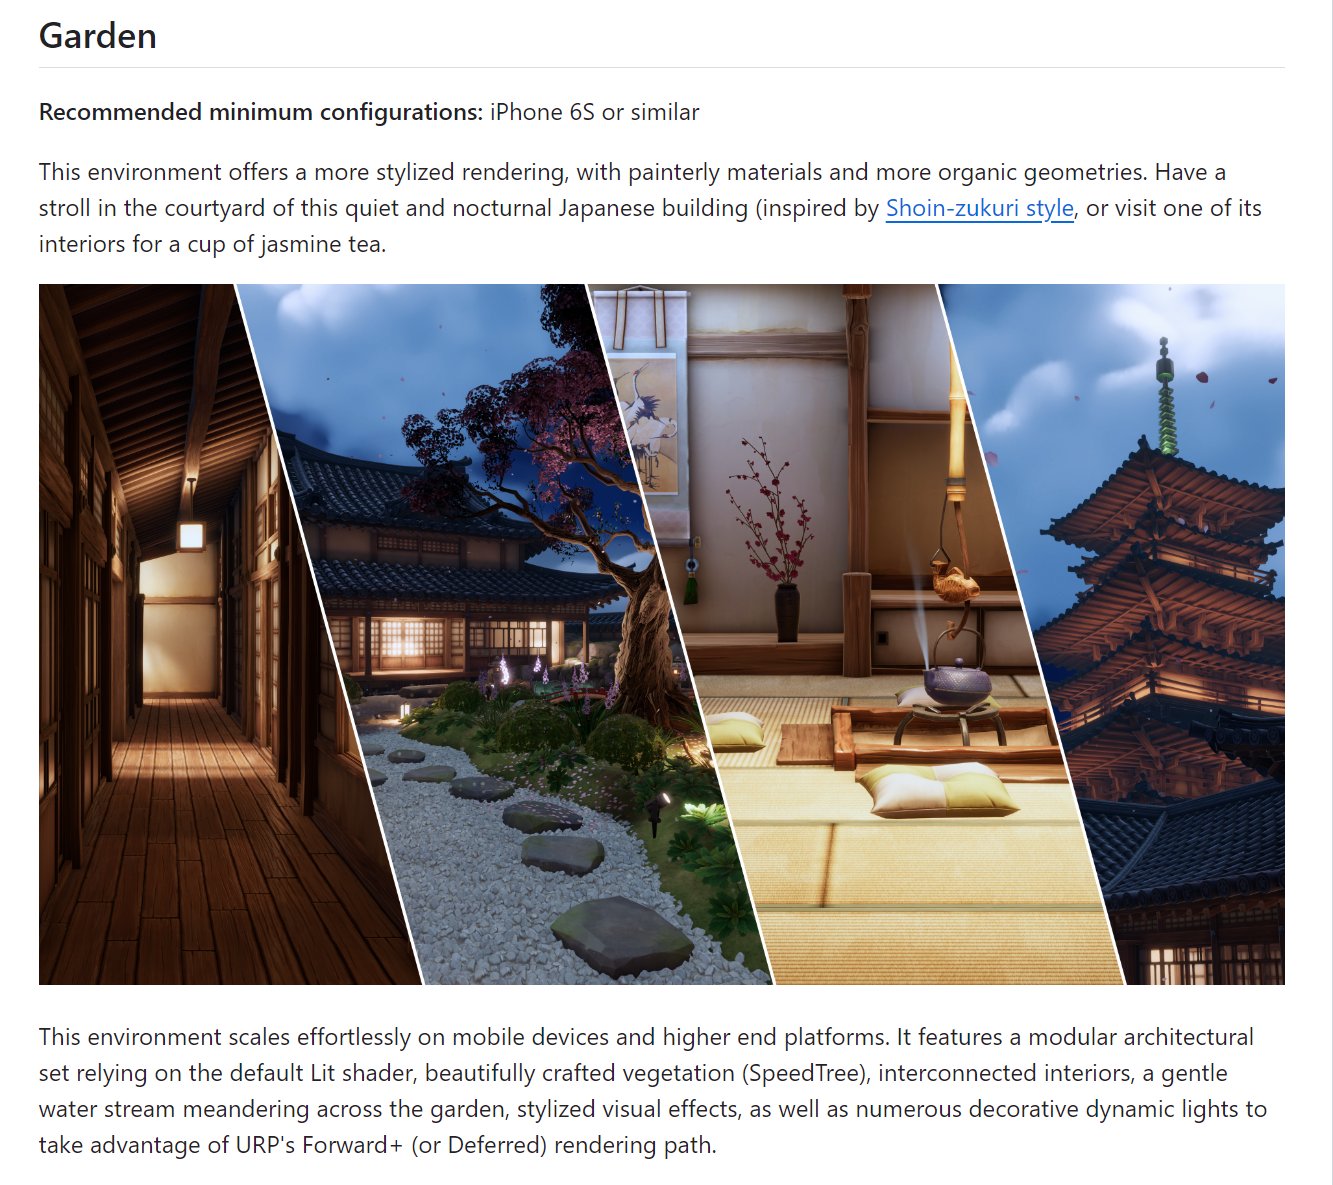
Garden Sample by Unity
Import your Ready Player Me avatar into Unity
Before adding your Ready Player Me avatar, ensure the Ready Player Me Core SDK package has already been imported into your Unity Project. You can find more information on how to do this in the first step of the "Getting Started With Ready Player Me Integration in Unity" blog post.
Once the package is added to your project, create an avatar using the Ready Player Me Avatar Creator and copy the GLB file’s URL. In Unity, let’s start by creating a new Avatar Config. Right-click on the Assets folder, and choose Create → Ready Player Me → Avatar Configuration.
This will create an Avatar Config asset file, as shown in the image below. Let’s edit the Texture Atlas field and set it to High (1024).
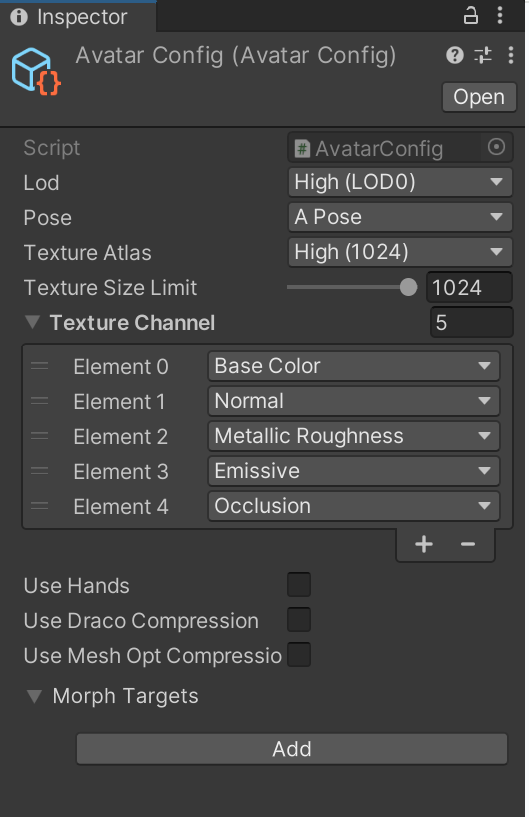
Avatar Config Asset file
Now, it’s time to import our avatar into the scene. First, go to the Ready Player Me top menu, then Settings, and under Avatar Settings, add the Avatar Config Asset we just created into the Avatar Config field and then close the Settings window.
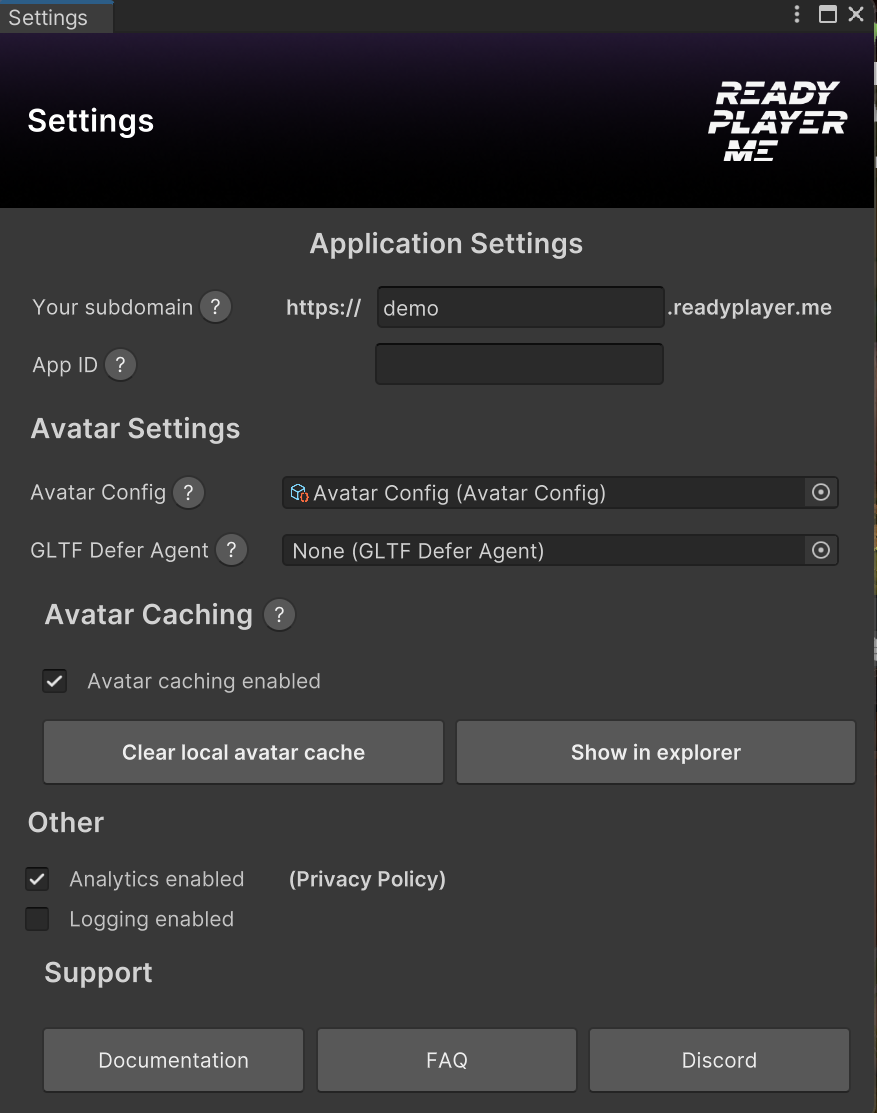
Adding Avatar Config to Application Settings
Let’s go to the Ready Player Me top menu again, then Avatar Loader. Paste the avatar URL and press the Load Avatar into the Current Scene button. This will load your character with the configuration specified in the settings.
Note that you can still load characters without config. In this example we decided to use a config just to have one unique material for our character. This will make it easier to update the material since there will be only one. However, you can still load without config, which means your character will have different materials for each body part (Left Eye, Right Eye, Head, Teeth, Body, Outfit Bottom, Outfit Footwear, Outfit Top, and Hair). The latter option allows adjusting each character's parts separately using different materials. However, we'll use the first option for simplicity, dealing with only one material for updating. The process remains the same.
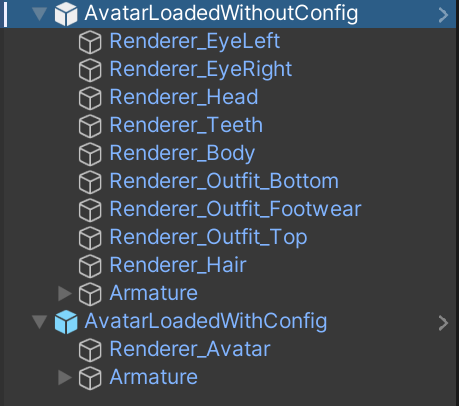
The difference when loading your character with and without configuration
Once your character is loaded, you can move it around and place it where you want in your environment before we start applying the Toon Shader.
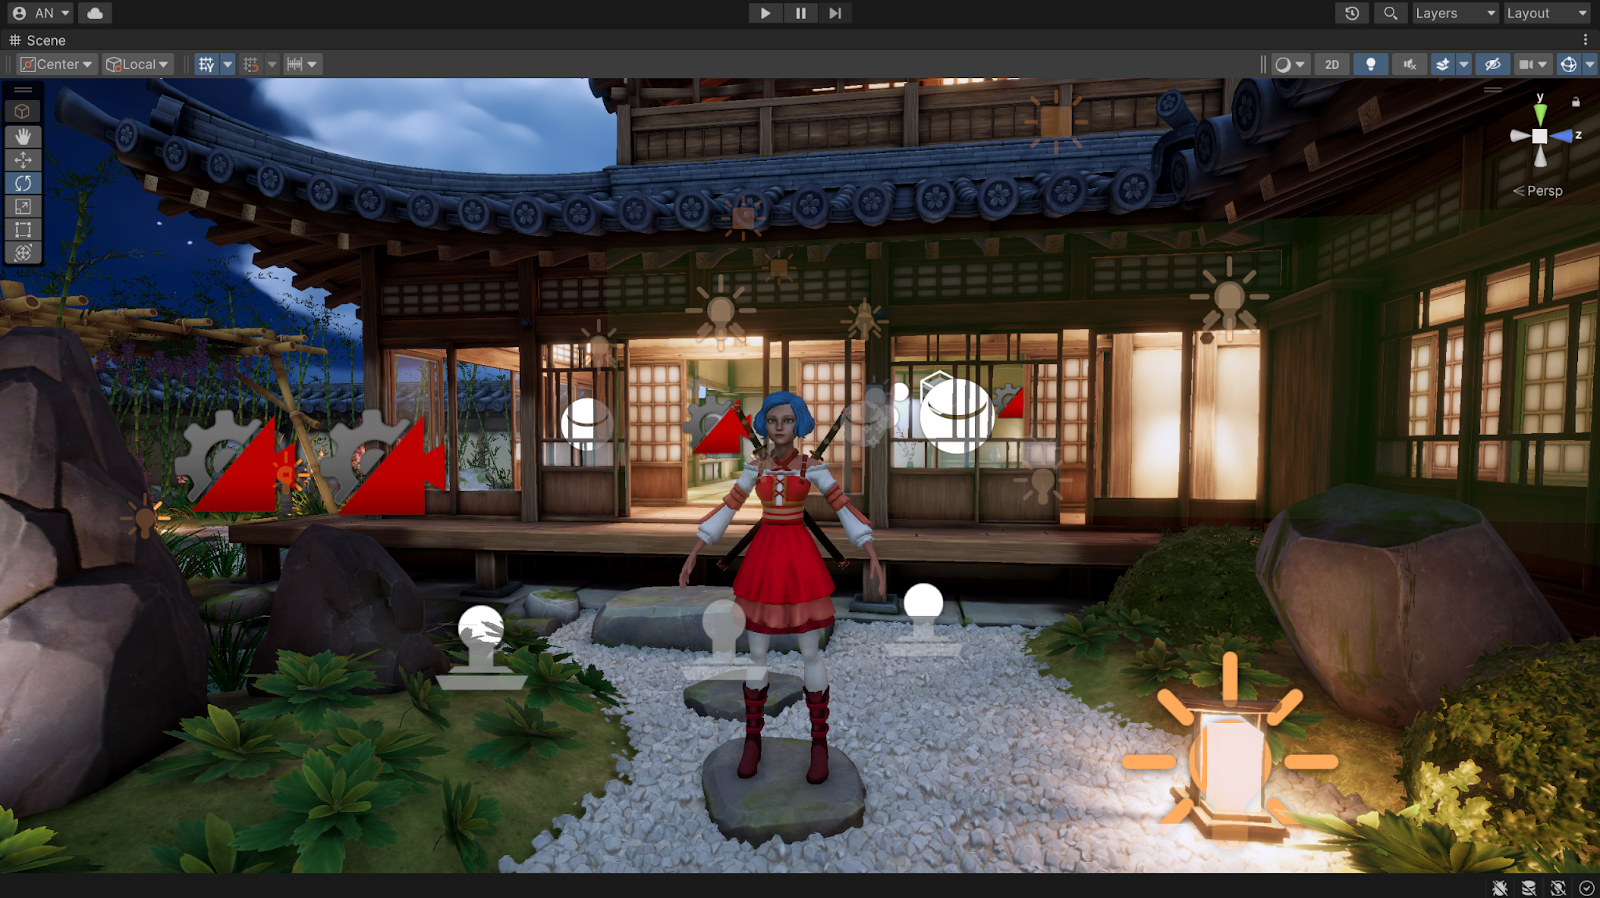
Ready Player Me Character imported into Garden Unity Sample
Import and use the Toon Shader With Avatars in Unity
We will be using a Zelda-inspired Toon Shader, made by Ciro Continisio, available for free on the Unity Asset Store. The artistic features of this Shader as described by the author:
Toon shader with 2/3 hard bands of light and shadows, specular contribution, and additional artistic light effects. It supports a main directional light and one additional light (spot or point). Despite being an Unlit shader, it can cast and receive shadows. It features a sort of "sub-surface scattering": the object, when seen against the main light, is lit on its contours. The effect disappears when seen from the light direction.
Another main feature is a strong lateral shine in the direction where the main light is coming from. The intensity of this effect can be tuned per material or removed altogether.
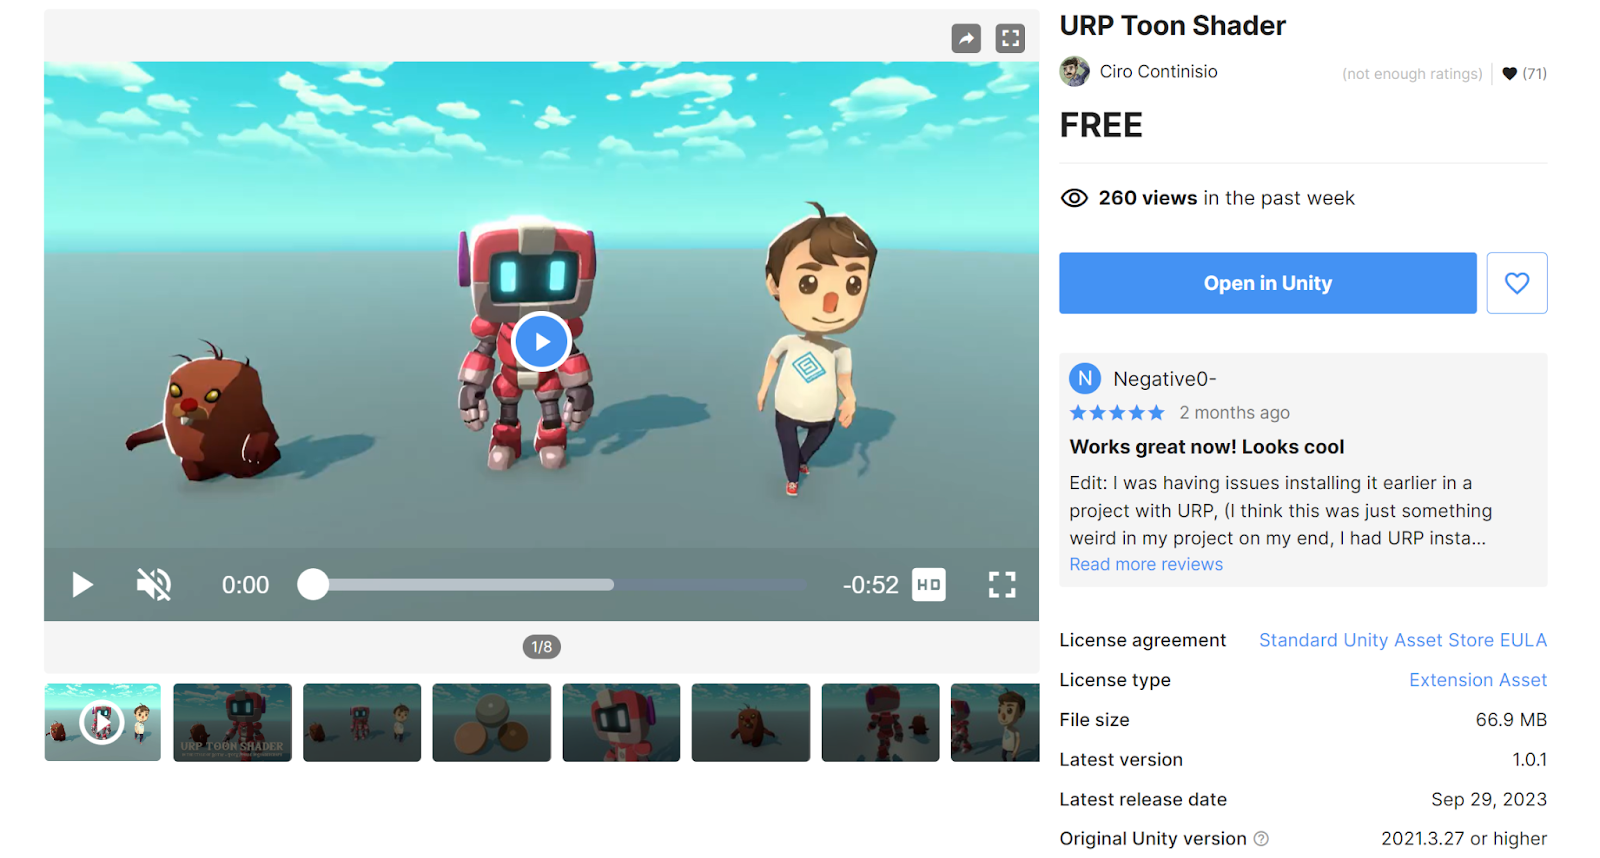
URP Toon Shader from Asset Store
Click 'Add to My Assets' if you're using the shader for the first time or 'Open in Unity' if you already have it. Once the assets are added, click import. Once the import is done, you can find a new folder called Ciro Continisio under Assets. Within the folder, you can find the ToonShader folder and then the Shader folder, where you will find the Shader Graph asset called Toon. Right-click on the asset → Create → Material. This will create a new material that uses the selected Shader Graph. Let’s name it ‘Toon’.
With the material already selected, let’s add the Base Map and Normal Map textures to the material in the inspector. Click select on each of the Texture fields and find the relevant textures. They should be called BASE_COLOR_OPAQUE and NORMAL_TEXTURE_OPAQUE, respectively.
If you use a config asset to load your character, you only need to create one material. Otherwise, you'll need to create a material for each character element and add the relevant textures.
We are doing this manually, but later, we will demonstrate how to load characters using the Shader at runtime, where we will show you how to do it in code.
Now, the material asset should look like the following screenshot.

Toon Material
In case you are also using the same environment we are using today (Garden Scene from Unity URP Sample), before adding the material to the character, find the DirectionalLight gameobject under the Root object and set the Type under the Light component → General to Realtime. Now go to Window → Rendering → Lighting and click the Generate Lights button on the newly opened window. This might take some time, depending on your machine.
Let’s duplicate the loaded avatar and move it slightly next to the initial character. Select the Render_Avatar gameObject under the character gameObject, then drag and drop the new material on the inspector. This will update the material to the newly dragged and dropped Toon Material. You can also drag and drop the material within the Materials array of the Renderer component.
Now, you will see the Material applied to your character. Feel free to adjust the material properties to better suit the style you are aiming for. To know more about what each property is controlling, you can find the details on the Toon Shader description on the Asset Store page.
Looking into our scene, we have these two characters with two different art styles!
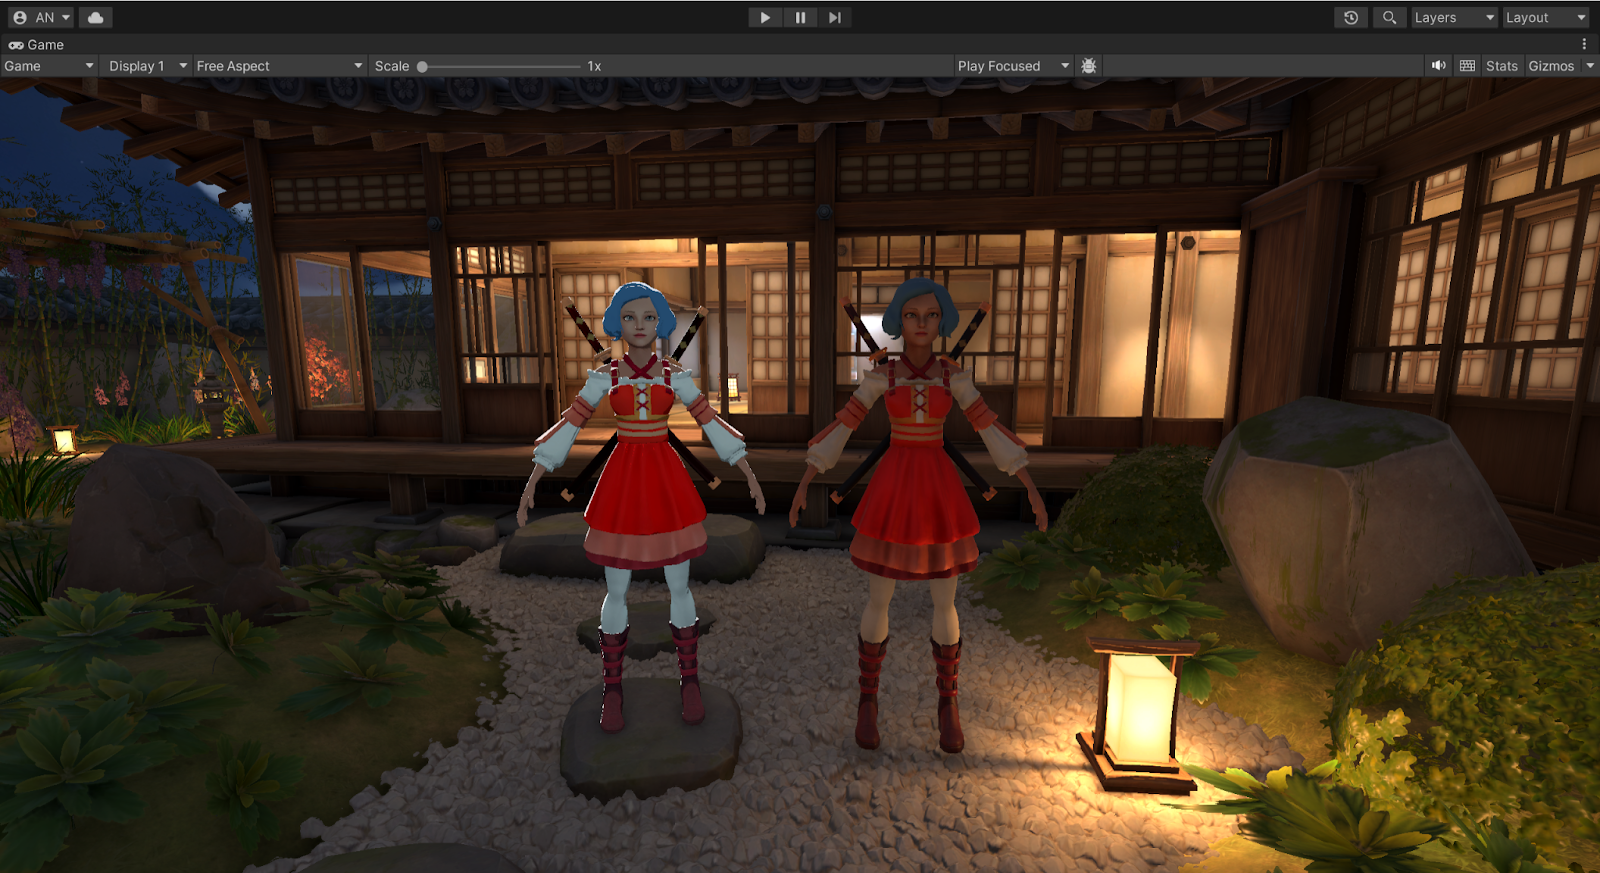
Characters loaded using different Shaders to achieve different styles
Animate your NPC characters
Now that we have our two character variants let’s place them as NPCs in our scene.
Let's animate the NPCs using a talk animation for today's example. We placed them sitting in the scene so we could have a little conversation between our loaded characters with different art styles. You can obtain the animations from our Ready Player Me Animation Library, Mixamo, or your custom animations. In Unity, create a Character Controller for both characters. Then, drag and drop it into the Animator component attached to the character's game object. To learn more about integrating animation, read our blog post: Get Started With Ready Player Me's Game-Ready Avatar Animation Library in Unity.
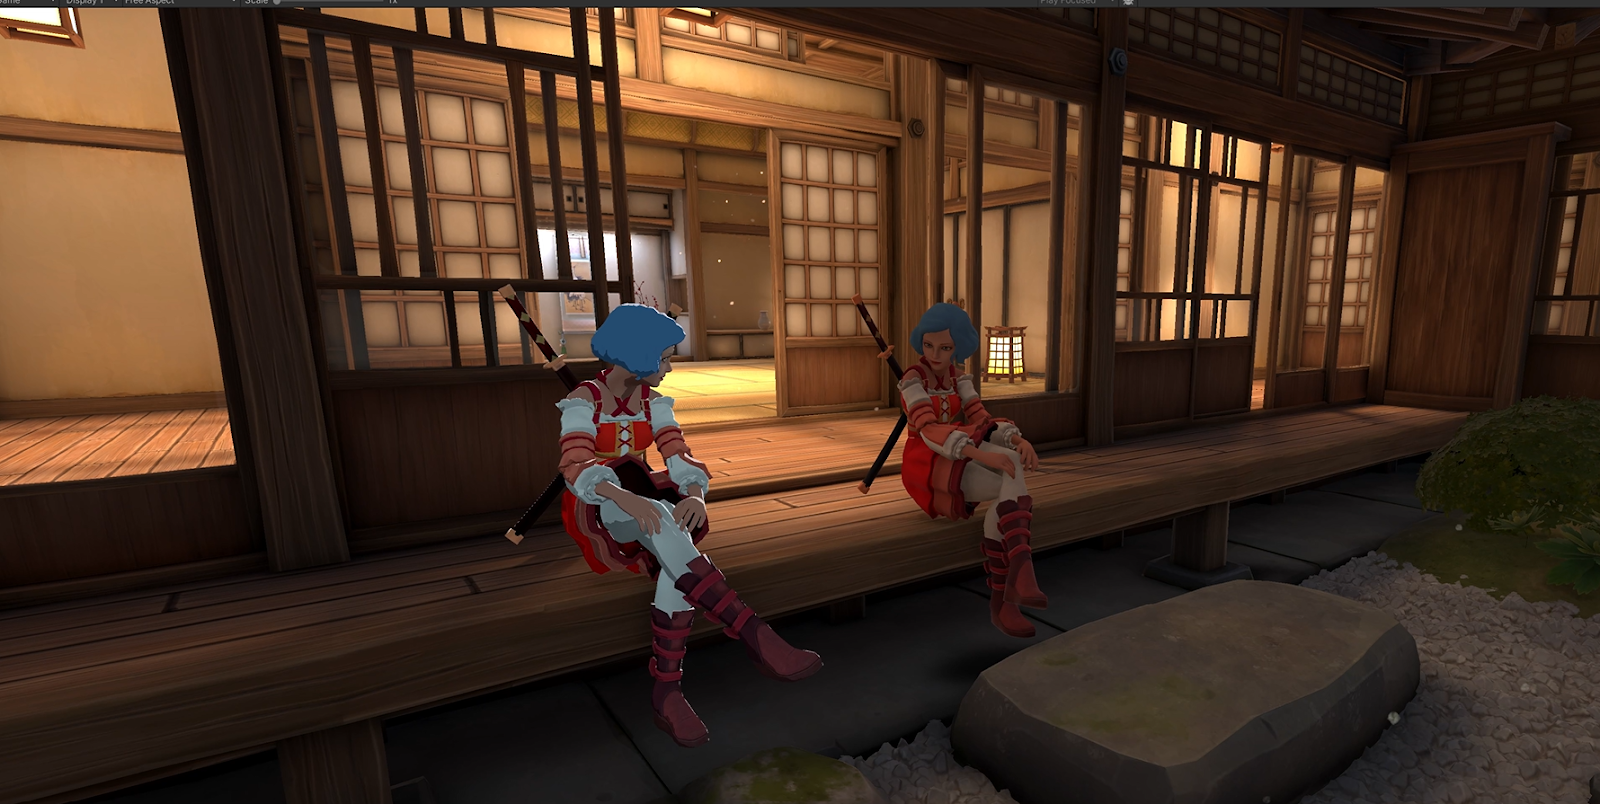
Adding talk animation to characters
Bonus: Animate your NPC characters’ speech
If you also used talk animation, let’s set a stretch goal to animate your characters’ speech. To do this, we will use the Voice Handler component that comes with Ready Player Me Unity SDK. All you need to do is add the component to the character gameobject, choose Audio Clip as AudioProvider, and then drag the audio file into the AudioSource. You can also use a microphone as an Audio provider for real-time voice input.
Adding the Voice Handler Component will automatically add an Audio Source component. In this example, we disabled the sound and focused solely on the lips' animation by setting the volume property to 0.
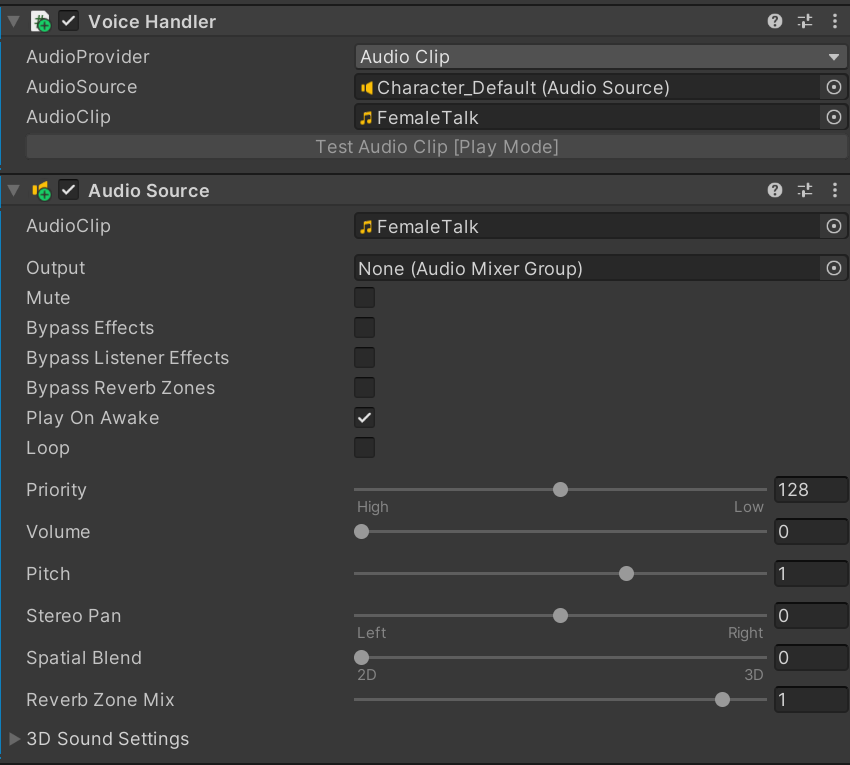
Voice Handler and Audio Source components
To make sure the sound starts playing in a loop when we start the game, let’s add a Talk script to the character gameobject in which we will start a coroutine on Start to ensure we wait for one second after pressing play to call the Voice Handler method to play the current audio clip. Then, we set the loop property from the Audio Source component to true.
public class Talk: MonoBehaviour
{
    void Start()
    {
        StartCoroutine(WaitAndPlaySound());
    }
    private IEnumerator WaitAndPlaySound()
    {
        yield return new WaitForSeconds(1);
        GetComponent<AudioSource>().loop=true;
        GetComponent<VoiceHandler>().PlayCurrentAudioClip();
    }
}
Make the Main Character move following player input
The next step is to make the gameplay character move following our input. We can use prefabs from the existing Ready Player Me QuickStart sample demos. Go to the Window menu on the top, then Package Manager and find Ready Player Me Core Package. Under the Samples tab, you can discover QuickStart Samples. Click Import. You can also use your own third-person controller scripts.
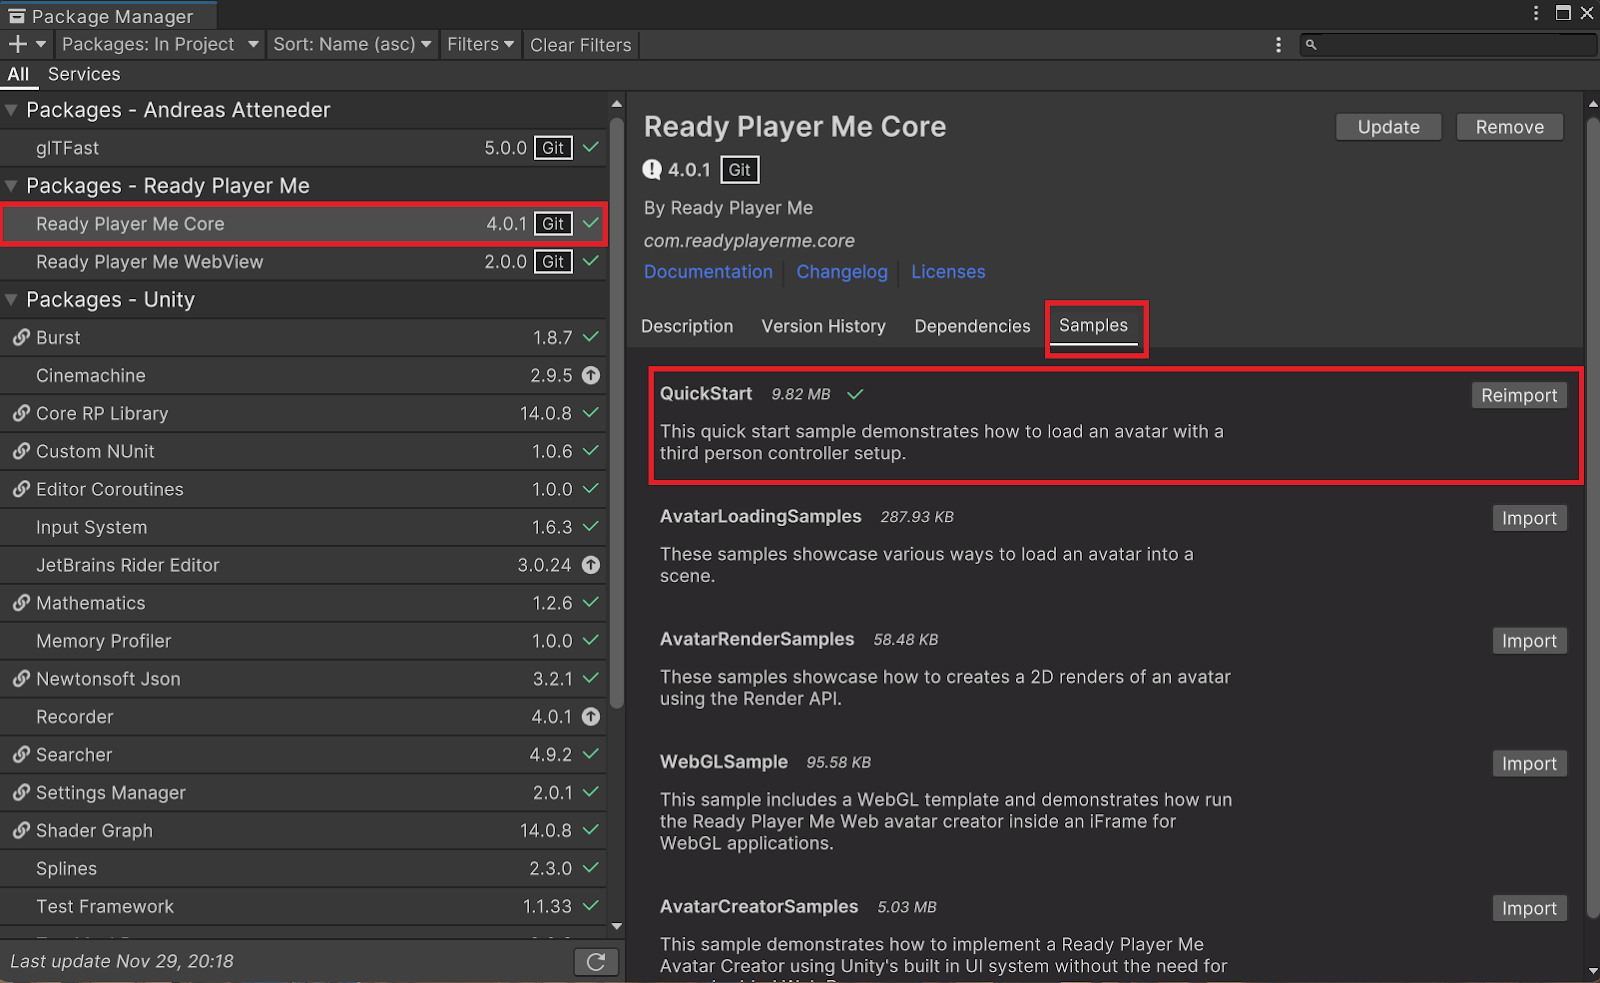
Accessing Ready Player Me Samples
Now, you will notice a Samples folder has been added. Navigate to Samples → Ready Player Me Core → 4.01 → QuickStart. Within the Prefabs folder, you will find the following:
- RPM Camera Rig
- RPM Player
Drag these prefabs into the currently open scene. Now, we need to populate these objects. Select the gameplay character gameobject. In the Player Camera field under the Third Person Movement script component, we need to assign the camera gameobject. You can find it under the RPM Camera Rig gameobject.
In the 'Preview Avatar' field of the Third Person Loader Script, assign the character you're using as the gameplay character by dragging and dropping it into the field.
Next, select the RPM Camera Rig game object and drag the RPM Player into the 'Player Input' field of the Camera Orbit script component.
Now that our scene is set up, one last step you need to do depends on what input system you are using for your project. If you are using the Garden sample from Unity, the project uses the new Input System Package by Unity, and the Ready Player Me samples use the Unity Input Manager. So, make sure to switch to the relevant one for your project. In this case, we will set it to Both to allow support for both systems in the project.
To do this, go to Edit → Project Settings → Player, and then under Other Settings, find Configuration and set the Active Input Handling. Unity may prompt you to restart the project for these configuration changes to take effect.
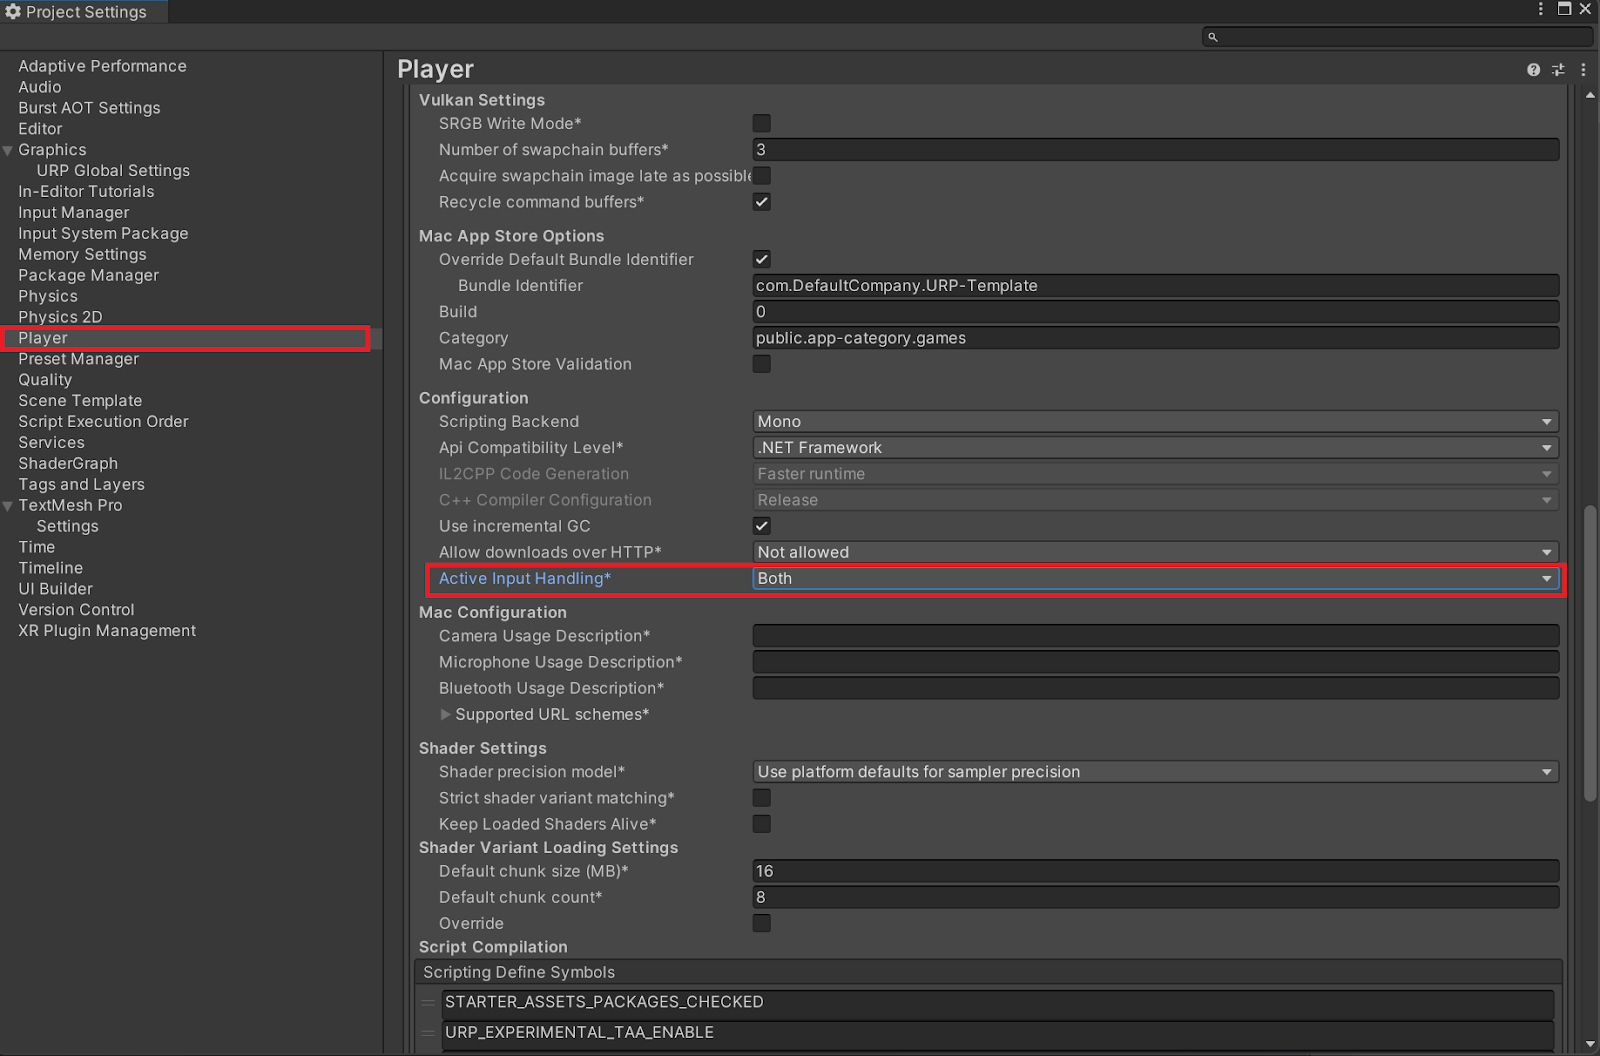
Setting up Active Input Handling
Now, press the play button to start and experience moving your character around!
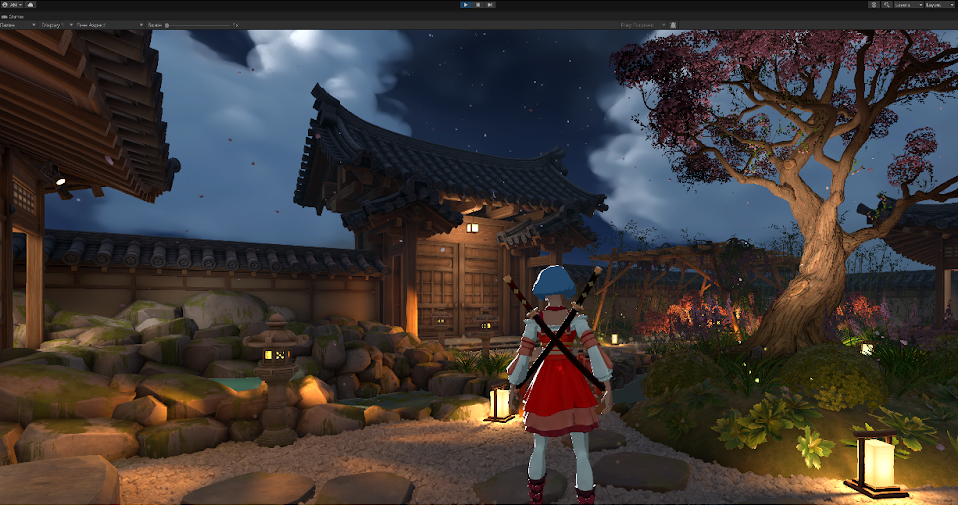
The gameplay character in the scene
Adding UI for Loading Characters at Runtime with Different Styles
Now that we have seen how to apply the style to avatars that we loaded in the editor, let’s learn how to do it at runtime.
We need to add an input field on the screen to allow you to paste the URL of the avatar to load. Let’s reuse the UI we have from the QuickStart Sample.
Under Assets, navigate to Samples → Ready Player Me Core → 4.01 → QuickStart and open the QuickStart scene.
Copy the two game objects:
- PersonalAvatarLoader
- Canvas
Move back to our initial Garden sample scene and paste the game objects into the hierarchy. Now, you should see the load UI on the game screen.
Unfolding the Canvas object, the PersonalAvatarPanel gameobject is disabled by default because we only enable it when we click the load button. Enable it so we can see it in edit mode, and let’s add the style parameter.
Above the loadAvatarButton game object, add a new gameobject of type UI → DropDown - TextMeshPro. Under the options of the DropDown component, add the following options: Default and Toon.
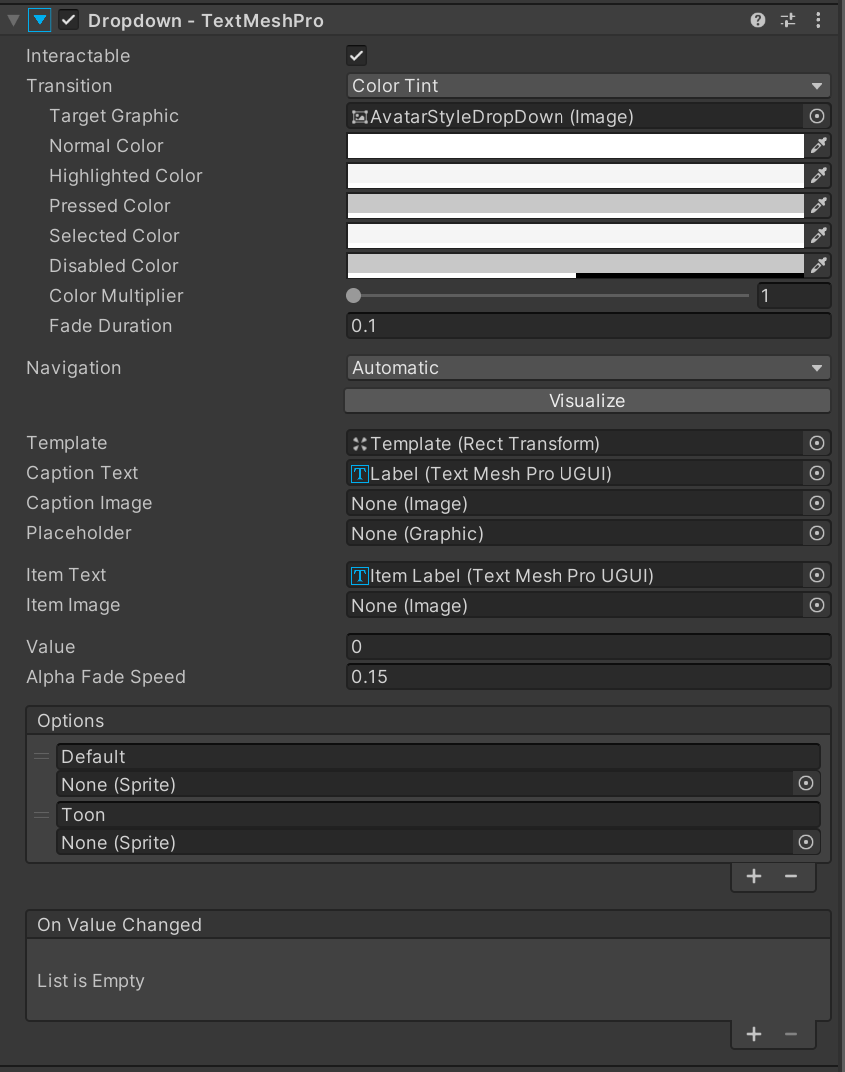
DropDown component with two style options
Ensure the newly added UI element fits within the panel by adjusting its position and scale. The UI now appears as follows.
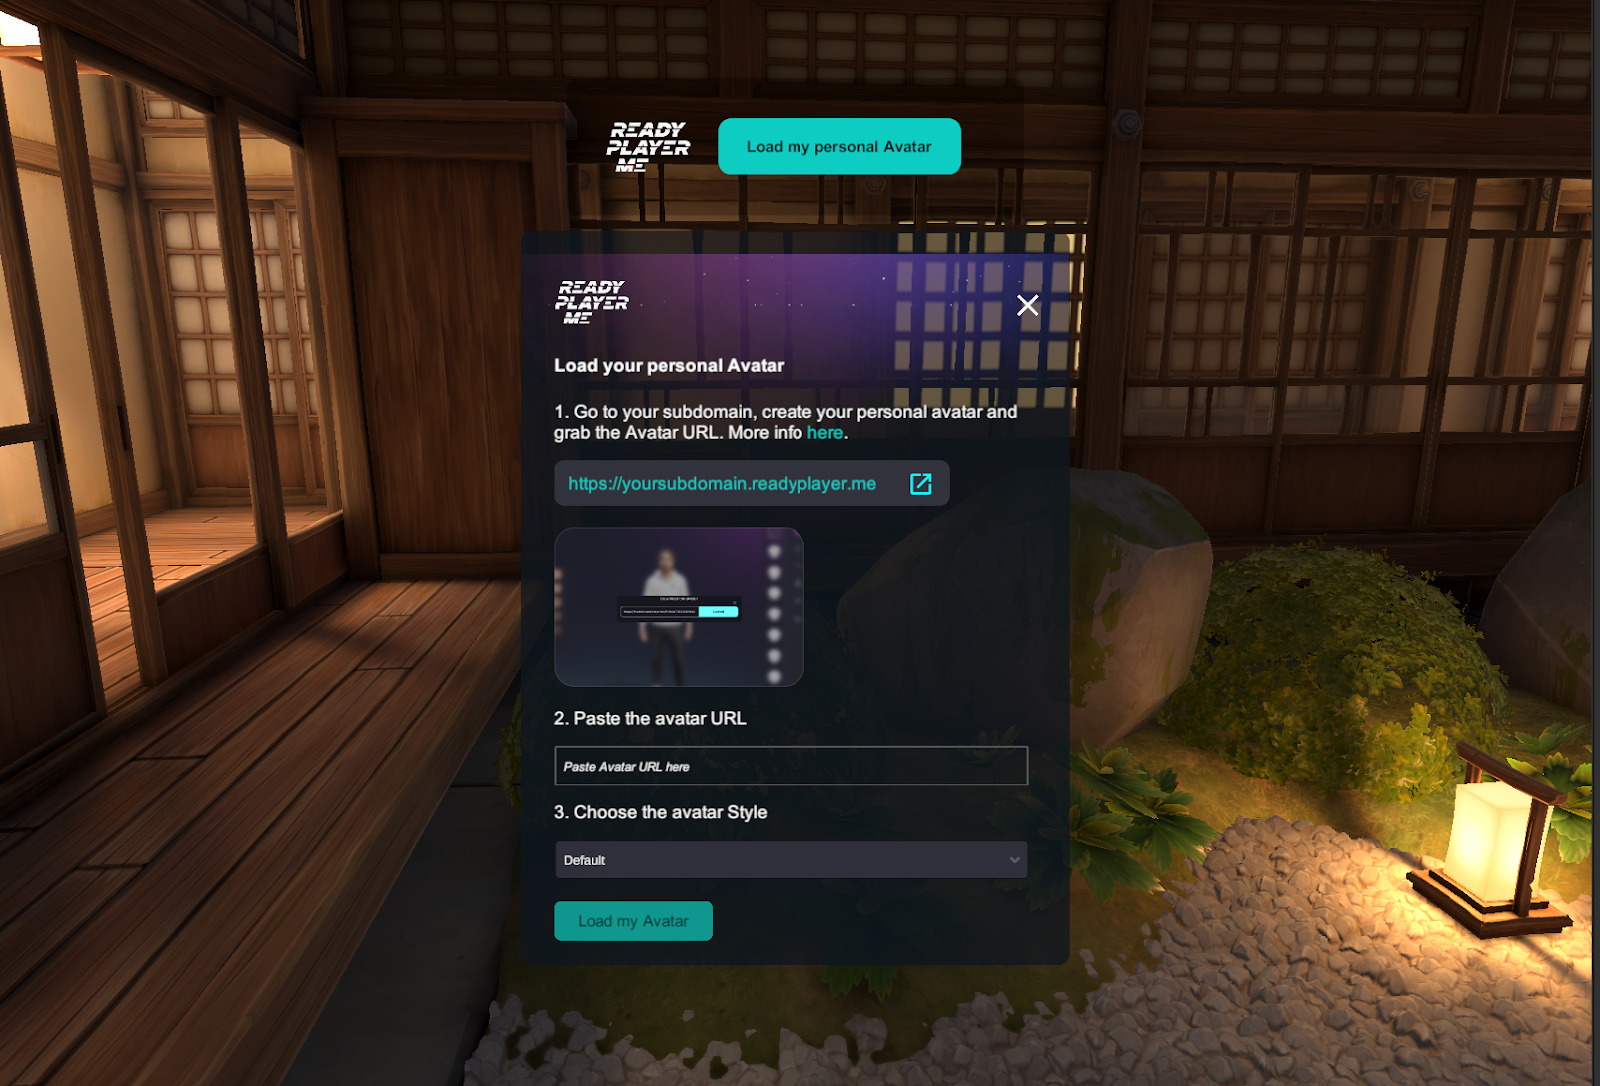
Loading character with style choice UI
Next, disable the PersonalAvatarPanel again. We're now ready to edit the scripts, enabling the UI to load characters in different styles.
Load Characters at Runtime with Different Styles
We need to create a public method on the ThirdPersonLoader to make it possible to access the loaded avatar.
First, let’s create a new private GameObject on the ThirdPersonLoader script called loadedAvatar to store the loaded avatar.
private GameObject loadedAvatar;
Now, on the OnLoadCompleted method, let’s assign the loaded avatar to the variable we created. Your method now should look like this:
       private void OnLoadCompleted(object sender, CompletionEventArgs args)
        {
            if (previewAvatar != null)
            {
                Destroy(previewAvatar);
                previewAvatar = null;
            }
            SetupAvatar(args.Avatar);
            loadedAvatar = args.Avatar;
            OnLoadComplete?.Invoke();
        }
Finally, let’s create the method to get the avatar:
public GameObject GetLoadedAvatar()
{
	return loadedAvatar;
}
Next, save the changes on the script, and let’s move to the PersonalAvatarLoader script.
Declare an Enum where we specify the different styles we are using today:
enum ArtStyle {Default, Toon};
Within the script class, under the UI header, let’s add a serialized TMP_Dropdown variable for our newly created drop-down:
[SerializeField] private TMPro.TMP_Dropdown avatarStyleDropdown;
Let’s create a new header called Art Styles, where we will add a reference to the toon material we will use when loading a character at runtime. Today, we are only using the Toon style, but this is extendable to other styles in the future.
[Header("Art Styles")]
[SerializeField] private Material toonMaterial;
Then, we add a reference to the loaded character that we will populate later in the script from the method we created on the ThirdPersonLoader script. Along with the current avatar style.
private ArtStyle currentAvatarStyle;
private GameObject loadedCharacter;
Now, within the script, we will create two methods:
- ApplyStyle(), Which will look into the avatar style drop-down value and set the current style calling the method we will cover next, which is ApplyMaterial, except if we are loading the character with the default material, then we just need to set the current avatar style and then return to leave the method execution.
private void ApplyStyle()
{
    switch (avatarStyleDropdown.value)
    {
        case 0: //Default
            currentAvatarStyle = ArtStyle.Default;
            return;
        case 1: //Toon
            currentAvatarStyle = ArtStyle.Toon;
            ApplyMaterial();
            break;
    }
}
- The following method is ApplyMaterial, which will basically look for all the SkinnedMeshRenderer components under the loaded character and make sure to replace the default material with the new one but also store both the base color main texture and the normal map texture to be able to assign them to the new style material.
private void ApplyMaterial()
{
    SkinnedMeshRenderer[] children = loadedCharacter.GetComponentsInChildren<SkinnedMeshRenderer>();
    foreach (SkinnedMeshRenderer meshRenderer in children)
    {
        if (meshRenderer.materials[0] != null)
        {
            Material currentMaterial = meshRenderer.materials[0];
            //Storing base color texture
            Texture MainTexture = currentMaterial.GetTexture("baseColorTexture");
            //Storing normal map texture
            Texture NormalTexture = currentMaterial.GetTexture("normalTexture");
            Material newMaterial = new Material((Shader.Find("Shader Graphs/Toon")));
            switch (currentAvatarStyle)
            {
                case ArtStyle.Toon:
                    newMaterial.CopyPropertiesFromMaterial(toonMaterial);
                    break;
            }
            newMaterial.SetTexture("_BaseMap", MainTexture);
            newMaterial.SetTexture("_NormalMap", NormalTexture);
            meshRenderer.material = newMaterial;
        }
    }
}
Now, just before we finish this script, let’s make sure the ApplyStyle method is called under the OnLoadComplete method. The method should look like the following:
private void OnLoadComplete()
{
    thirdPersonLoader.OnLoadComplete -= OnLoadComplete;
    loadedCharacter = thirdPersonLoader.GetLoadedAvatar();
    SetActiveLoading(false, defaultButtonText);
    ApplyStyle();
}
Next, let’s save the script and go back to the editor. Select the PersonalAvatarLoader object, then add the references to the newly added properties. Under UI, make sure to assign the AvatarStyleDropDown.
In the Inspector panel for the PersonalAvatarLoader object, locate the Art Styles header and assign the previously created Toon material to the Toon material property
Access the Demo on GitHub
Now that we have built the demo, you can grab it on GitHub. Let us know if you have any questions in our Ready Player Me Forums. We would love to hear how you integrated the Ready Player Me Characters into your project with different art styles. Feel free to suggest other topics you want us to cover in future blog posts.