How to build your first Apple Vision Pro app featuring Ready Player Me Avatars and Unity PolySpatial package
.png)
In this blog post, we'll guide you through the step-by-step process of building your first Apple Vision Pro app featuring Ready Player Me avatars using the PolySpatial package in Unity. PolySpatial offers a comprehensive set of technologies designed to address the unique challenges associated with developing for Vision Pro.
Table of contents
- Requirements
- Installing Xcode and visionOS simulator
- Unity editor and modules installation and project setup
- visionOS applications types in Unity
- Import your Ready Player Me avatar into Unity
- PolySpatial package installation
- PolySpatial MR App modes and volumes
- Exploring PolySpatial Samples
- Creating PolySpatial MR App featuring Ready Player Me avatars
- Sign up to access our new features and tools built for XR
1. Requirements
To be able to build for the Vision Pro device, there are some requirements that you need to make sure you have:
- For the hardware, you need an Apple silicon (M1 or newer) Mac to compile for visionOS.
- Compiling for visionOS currently requires Xcode version 15.2. In the next step, we will show you the steps to install and set it up.
- Unity version 2022.3 (LTS) or later is required to allow the use of Unity PolySpatial and its support for visionOS. We will walk through the setup of both the editor and the package in this blog.
Unity Pro is required to get the PolySpatial package. You can request a 30-day free trial by visiting the Unity Pro page.
2. Installing Xcode and visionOS simulator
Let’s start by installing Xcode 15.2. Visit the Apple Applications Developer downloads page. Make sure you have an Apple Developer account to log in and access the downloads page. In the search bar, type Xcode 15.2, then click on view details and then the download icon of the xip file. You can also get it from the Mac App Store.

Xcode version to install
Once the download is complete, start the installation. You will also need to select the target platform you want to develop for. Make sure to select visionOS 1.0 and then click the Download & Install button.

Selecting visionOS 1.0 platform to develop for
This Xcode installation process includes the installation of the visionOS 1.0 simulator, enabling you to preview and iterate faster on your app development.
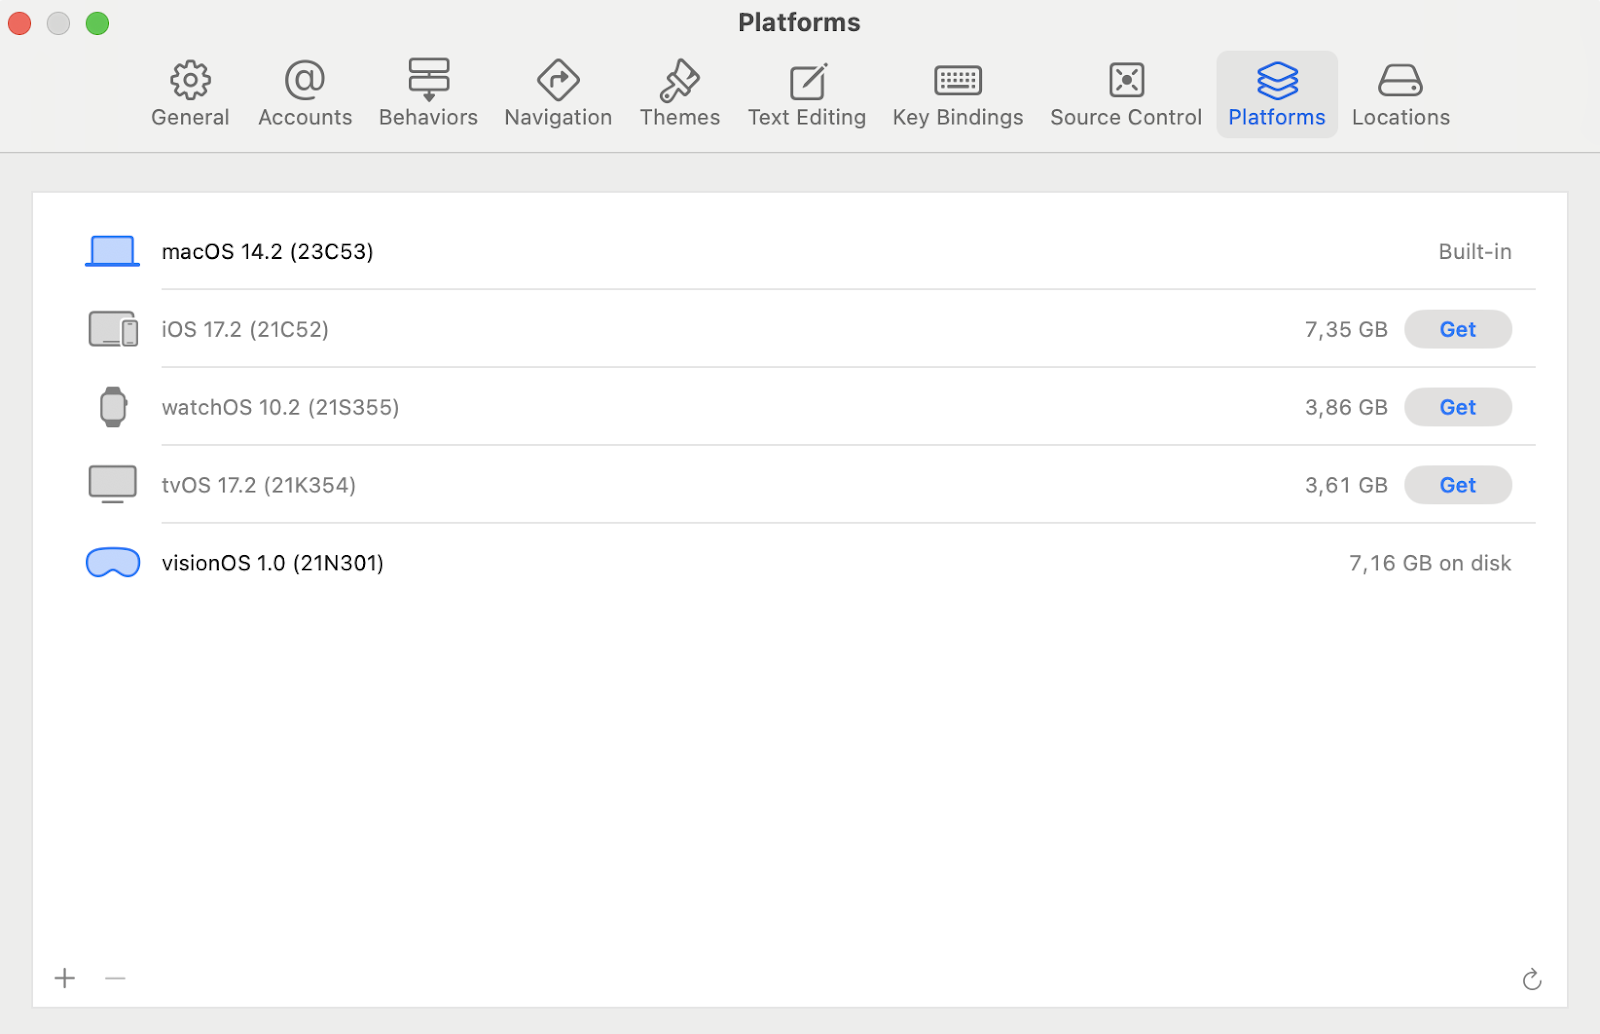
If you have Xcode already installed, you will need to download the visionOS 1.0 separately from either the Apple developer downloads page we used for downloading Xcode or from Xcode itself. For the latter, after launching Xcode, go to the Window in the Menu Bar and select Devices and Simulators. Then, in the top left, choose Simulators and click the + button in the bottom left of the window.
This will show you a window, open the OS version drop down like shown in the image below and choose to download more simulator runtimes.

Then, you will be able to click Get on the visionOS version that is compatible with your version of Xcode. You will also be able to see if there are any incompatible ones already installed, so you can go ahead and remove them.
Once the installations are done, you can open the Simulator app. Open Spotlight (Command Space) and type Simulator to find it. When the Simulator app launches, you will be able to see apps, including Safari. You can open the Ready Player Me website and start creating your avatar within the Vision Pro simulator!
You can resize the window and use the mouse to zoom in, rotate, and move the view in the room.
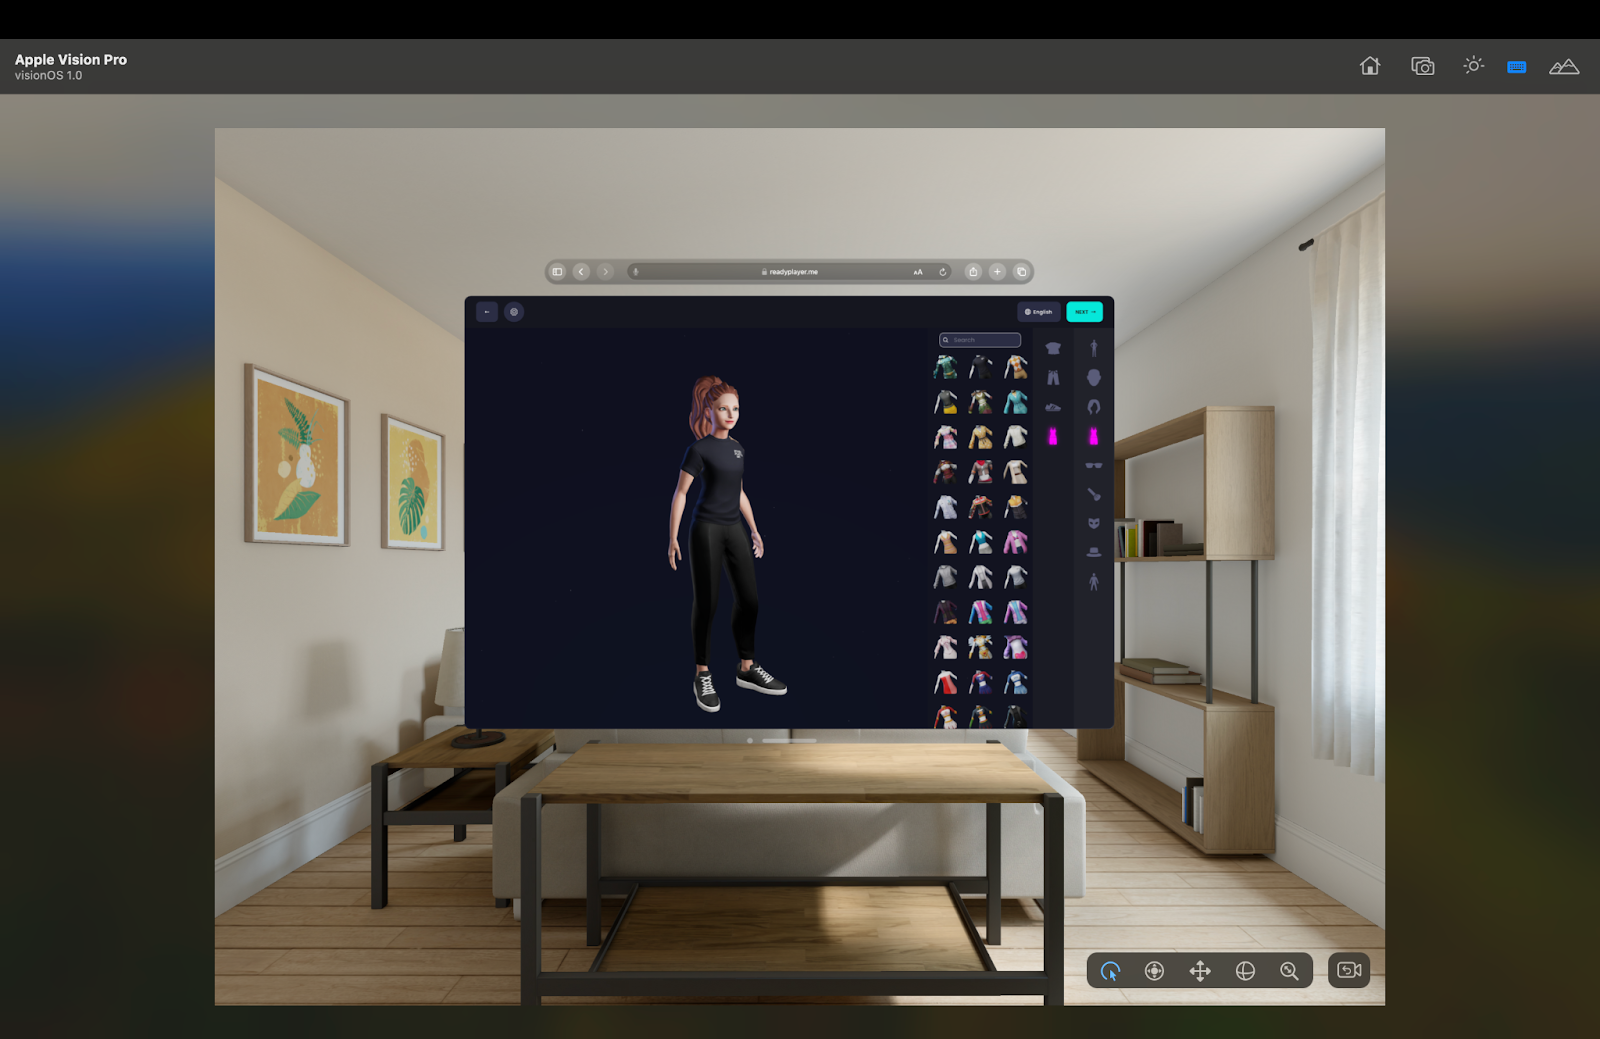
Customizing a Ready Player Me avatar when accessing the website in the Apple Vision Pro simulator
3. Unity Editor and modules installation and project setup
Now, let’s install the Unity editor. Make sure to use Unity Hub. If you don’t have it already installed, you can download it from the Unity Hub download page. Open Unity Hub, navigate to the Installs tab and click on the Install Editor button on the top right corner. Choose the latest Unity LTS release (2022.3.18f1 at the time of writing). Any 2022.3 or later Unity version also works, as mentioned in the previous technical requirements section.
Once the installation is complete, let’s proceed to install the required modules. Click on the gear icon on the installed version and select Add Modules. Under Platforms, scroll to iOS Build Support and visionOS Build Support and select both. Then press continue.
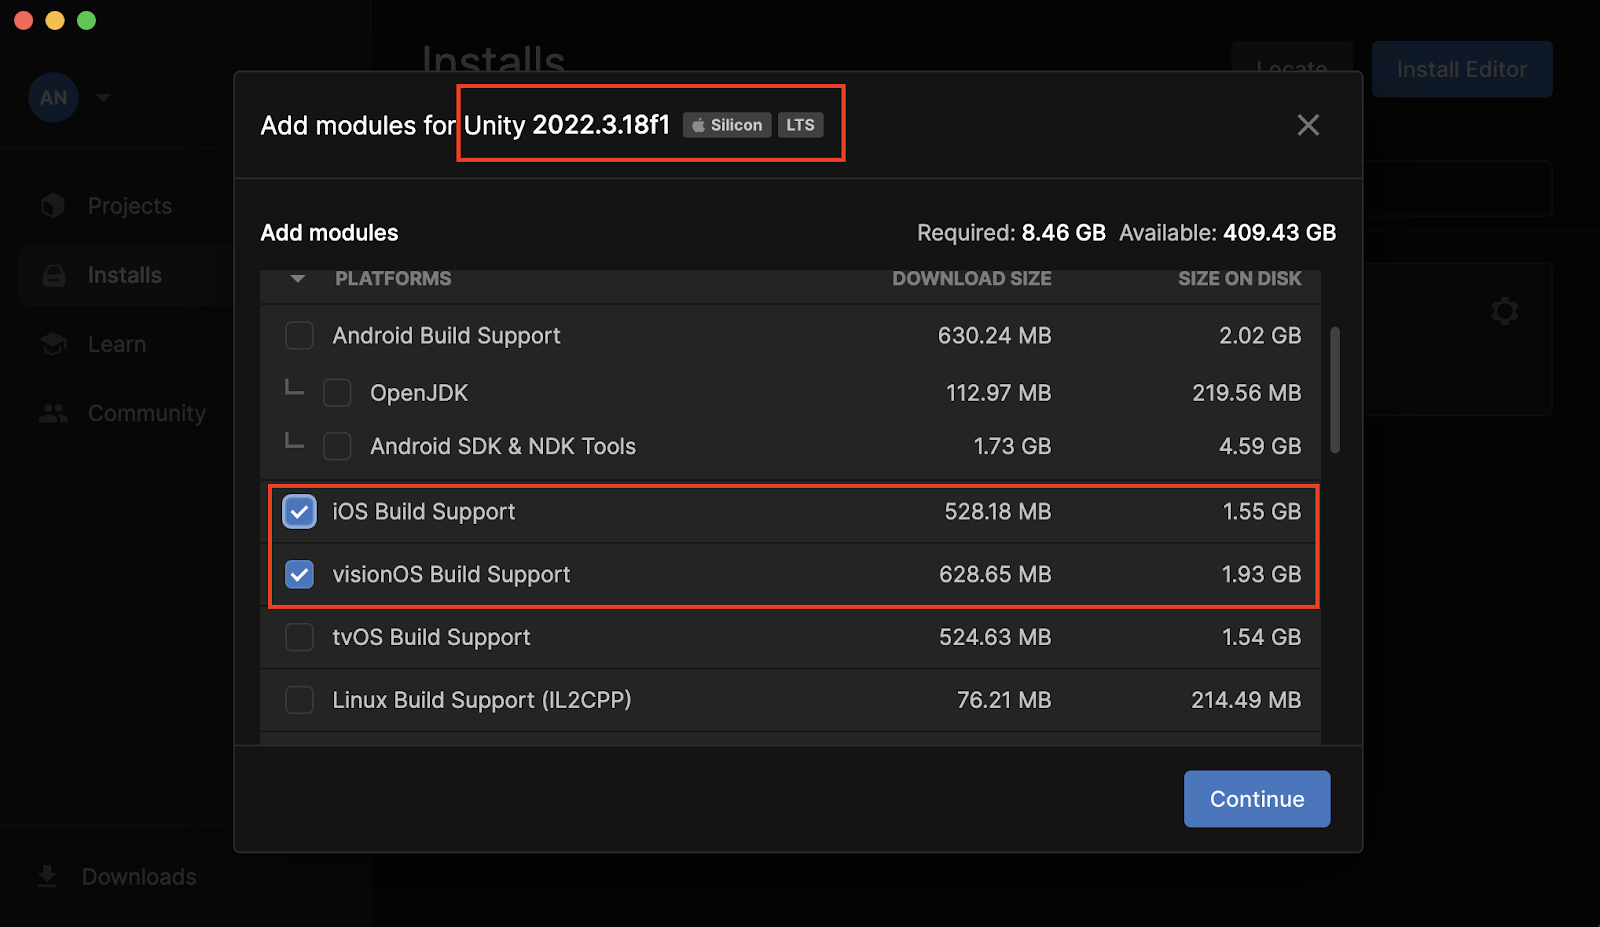
Unity modules to install
When installation is complete, go back to projects and create a new project using the 3D URP core package. You can either use the Universal Render Pipeline (URP) or the Built-in Render Pipeline. It’s recommended to use URP since it allows you to use tools like Shader Graph and access all PolySpatial features.
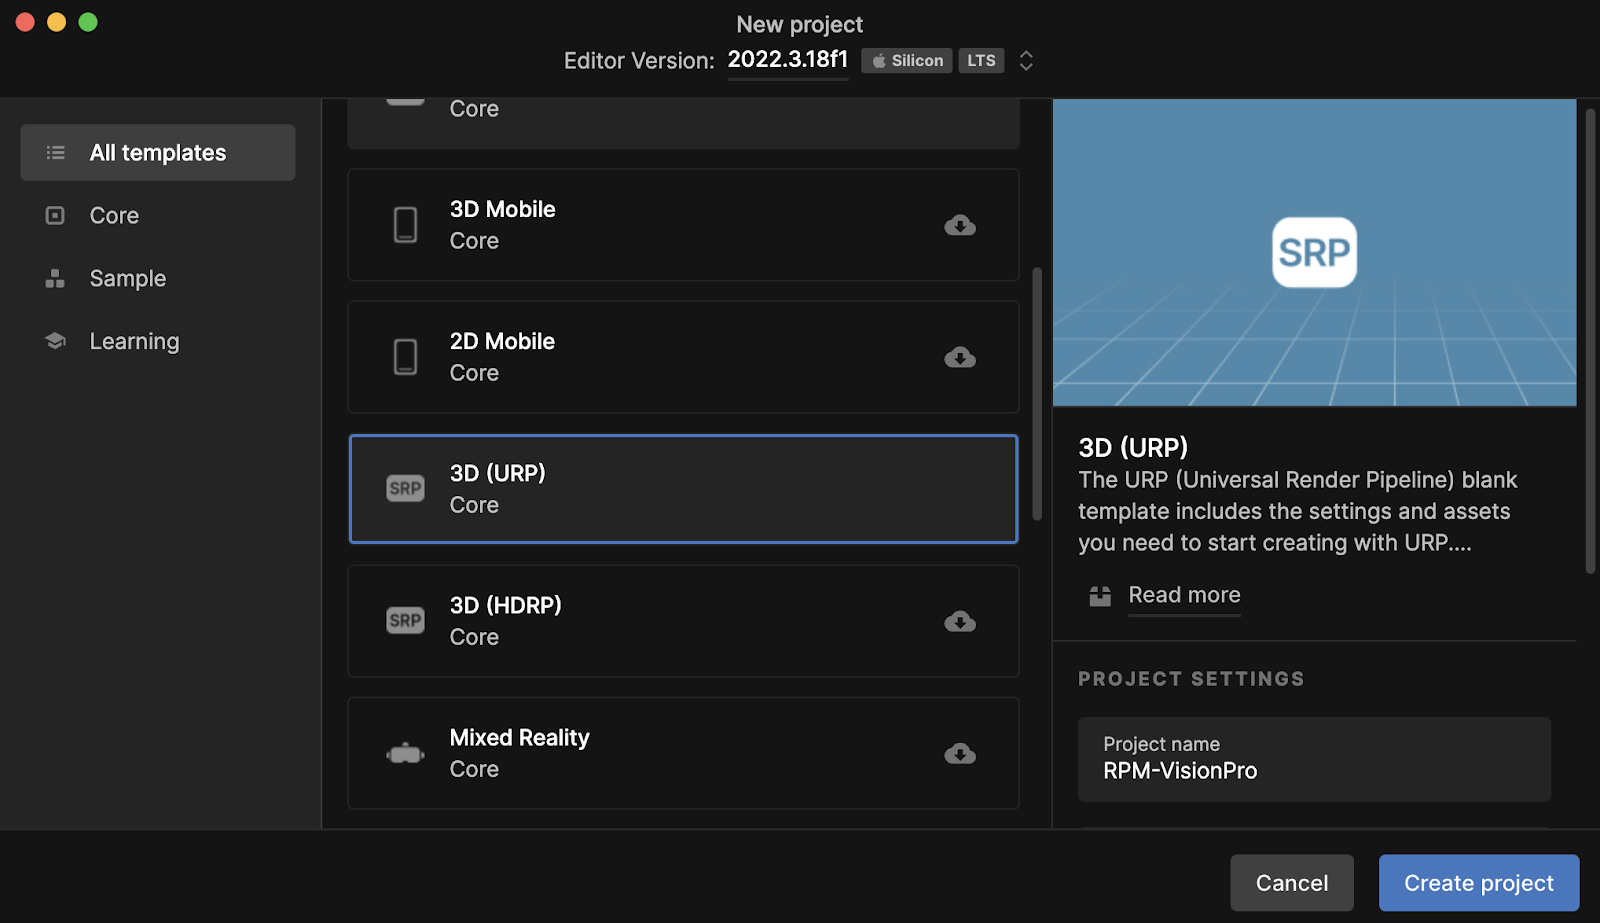
Creating a new URP project
Once the project opens, we start by setting up the build settings. Navigate to the top menu File and select Build Settings. Under the platform section, select visionOS, then check the Development Build checkbox, and finally, press the 'Switch Platform' button. Wait a few seconds until the switch is done.
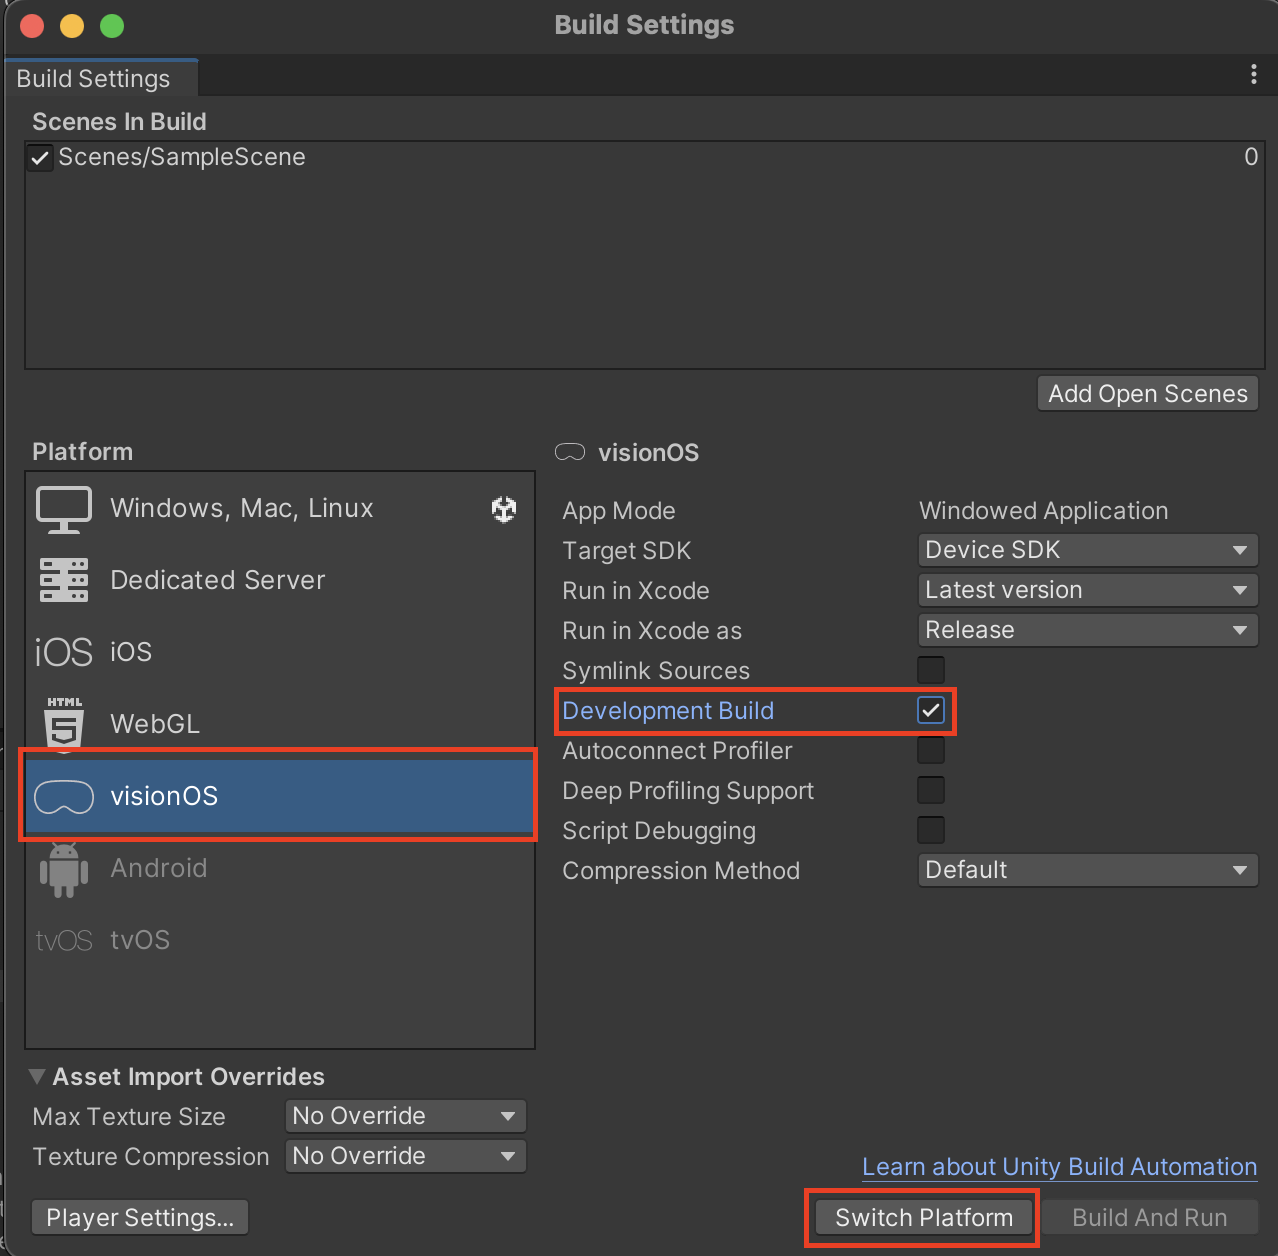
Setting up Build Settings
Now, in the same window, press Player Settings in the bottom left. The visionOS settings should be selected by default. Now, unfold Other Settings, scroll down to Target SDK and choose the Simulator SDK option.

Setting the Target SDK under Project Settings > Player
4. VisionOS applications types in Unity
When building an application for Vision Pro in Unity, you have access to three different options depending on your application needs:
- Windowed Apps: creating content that will run in a window on visionOS. This is similar to apps installed on Vision Pro like Safari, etc.
- Fully Immersive VR Apps: creating fully immersive virtual reality (VR) apps for visionOS. This is similar to a fully immersive VR experience with any standard VR headset.
- PolySpatial MR Apps: creating immersive mixed reality (MR) apps for visionOS. These apps require the use of the PolySpatial package, where apps are simulated with Unity but rendered with RealityKit (the system renderer of visionOS). This type of app introduces the concept of volume as defined in the PolySpatial package documentation:
Volumes are a new concept for mixed reality platforms. An application can create one or more volumes for displaying content in the mixed reality space. Each volume is an oriented box that contains 3D content. In visionOS, volumes can be moved and scaled in real-world space independently by the user, but not programmatically by the developer. Unity devs interact with Volumes using a new Unity component called a "Volume Camera."
It can be one of these two modes:
- Bounded Volumes
- Unbounded Volumes
We will explain later in section 7 what each type of volume is and when to use them.
Today, our focus will be on the PolySpatial MR Apps, where we'll build an app featuring a Ready Player Me avatar. If you want to know more about the other types of applications, you can also visit the visionOS Platform Overview page in the Unity PolySpatial documentation and follow the links for each type.
5. Import your Ready Player Me avatar into Unity
Before adding your Ready Player Me avatar, ensure the Ready Player Me Core SDK package has already been imported into your Unity Project. You can find more information on how to do this in the first step of the Getting Started With Ready Player Me Integration in Unity blog post. You can also get the Ready Player Me Package from the official Unity Asset Store and import it into your project.
Once the package is added to your project, create an avatar using the Ready Player Me Avatar Creator and copy the GLB file’s URL. In Unity, let’s start by creating a new Avatar Config. Right-click on the Assets folder, and choose Create → Ready Player Me → Avatar Configuration.
This will create an Avatar Config asset file, as shown in the image below. Let’s edit the Texture Atlas field and set it to High (1024).

Avatar Config Asset file
Now, it’s time to import our avatar into the scene. First, go to Tools in the Menu Bar, then Ready Player Me, then Settings, and under Avatar Settings, add the Avatar Config asset we just created into the Avatar Config field and then close the Settings window.
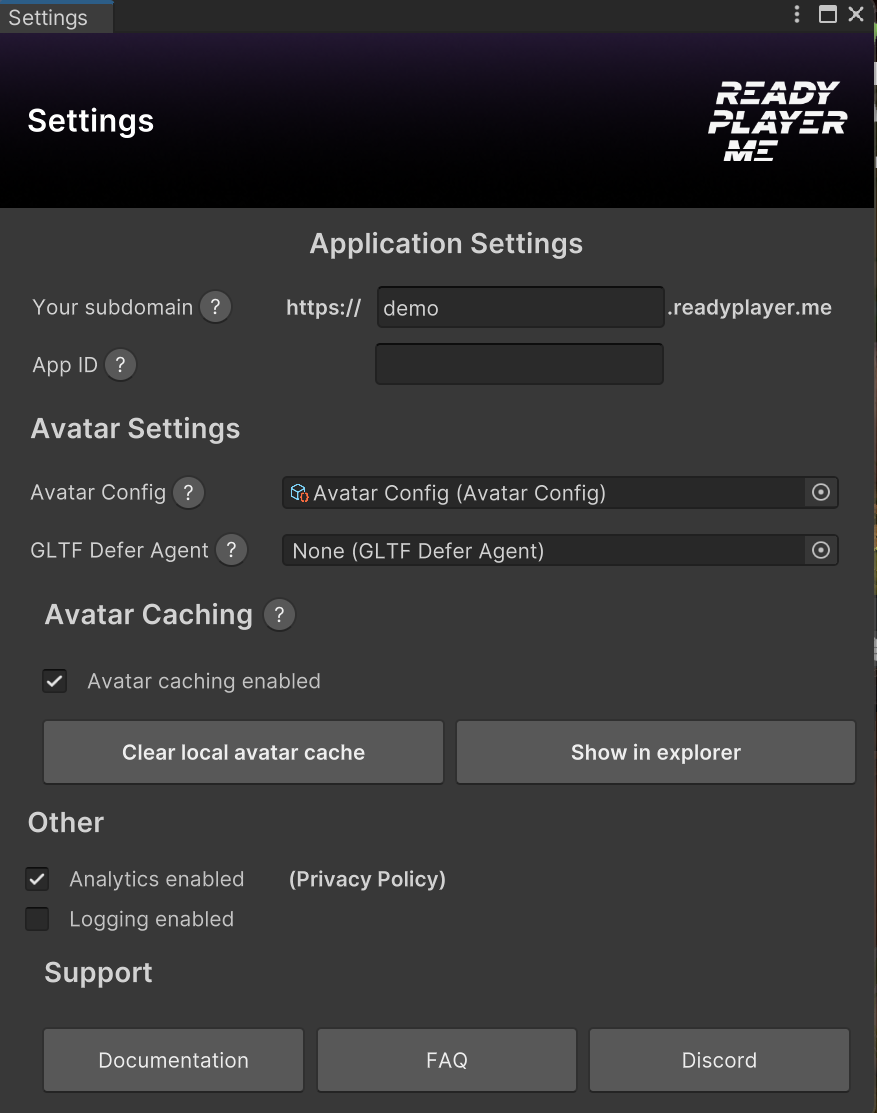
Adding Avatar Config to Application Settings
Let’s go to Tools in the Menu Bar again, then Ready Player Me, then Avatar Loader. Paste the avatar URL and press the Load Avatar into the Current Scene button. This will load your character with the configuration specified in the settings.
Note that you can still load characters without config. In this example we decided to use a config just to have one unique material for our character. This will make it easier to update the material since there will be only one. However, you can still load without config, which means your character will have different materials for each body part (Left Eye, Right Eye, Head, Teeth, Body, Outfit Bottom, Outfit Footwear, Outfit Top, and Hair). The latter option allows adjusting each character's parts separately using different materials. However, we'll use the first option for simplicity, dealing with only one material for updating. The process remains the same.
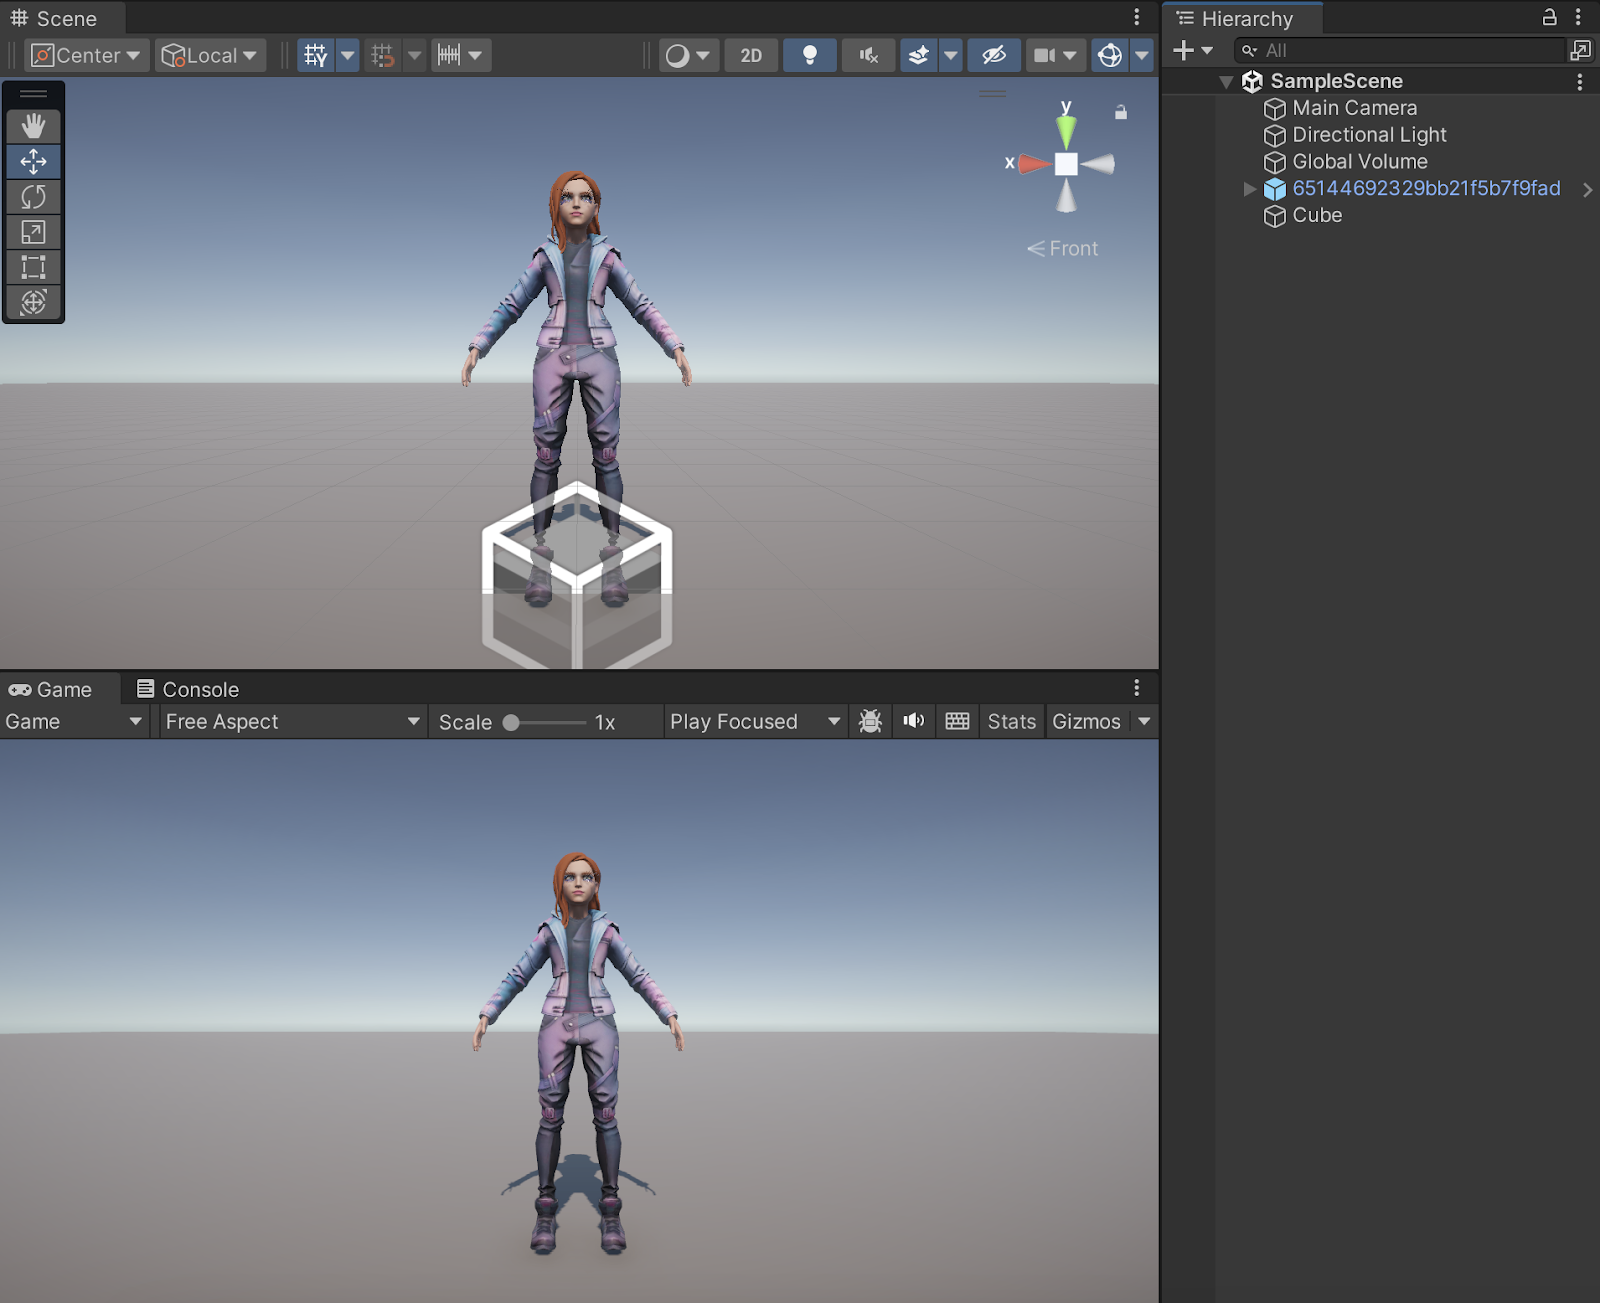
Ready Player Me avatar imported into the Unity scene
The reason why we will need to update the material is that we need to make sure to use a material that will render correctly in the simulator and, eventually, on Vision Pro itself. Ready Player Me avatars use the glTF Shader, which is made in Shader Graph. Although PolySpatial supports Shader Graph, it doesn’t support all the nodes, including some nodes used in the glTF Shader. This might change in the future as Unity keeps improving the Shader Graph support with the PolySpatial package. When the support of the custom nodes is added, we can skip this step. You can keep an eye on the Unity PolySpatial Shader Graph Support page to see what is supported and not supported so far.
However, for now, we will need to create a material that uses the Lit Universal Render Pipeline Shader, which is supported by PolySpatial.
To do this, start by creating a new folder called Materials under Assets. Right-click within the folder, then select Create → Material to create a new material and let’s call it “Avatar_Material.” By default, the material will be using the Lit Universal Render Pipeline. When you select the material, you can see the Shader that is being used under its name. You can always choose the relevant Shader from the drop-down menu.
Now, we will assign the different texture maps under the Surface Inputs fields of the material. Under Ready Player Me folder, then Avatars, you will find the avatar folder. Select it, and you will find the GLB file. In there, you can click on the arrow and visualize the textures. Now let’s drag the Base_COLOR texture into the Base Map, METALLIC into the Metallic Map and the NORMAL_MAP into the Normal Map properly fields of the URP Lit material we have already created and selected.
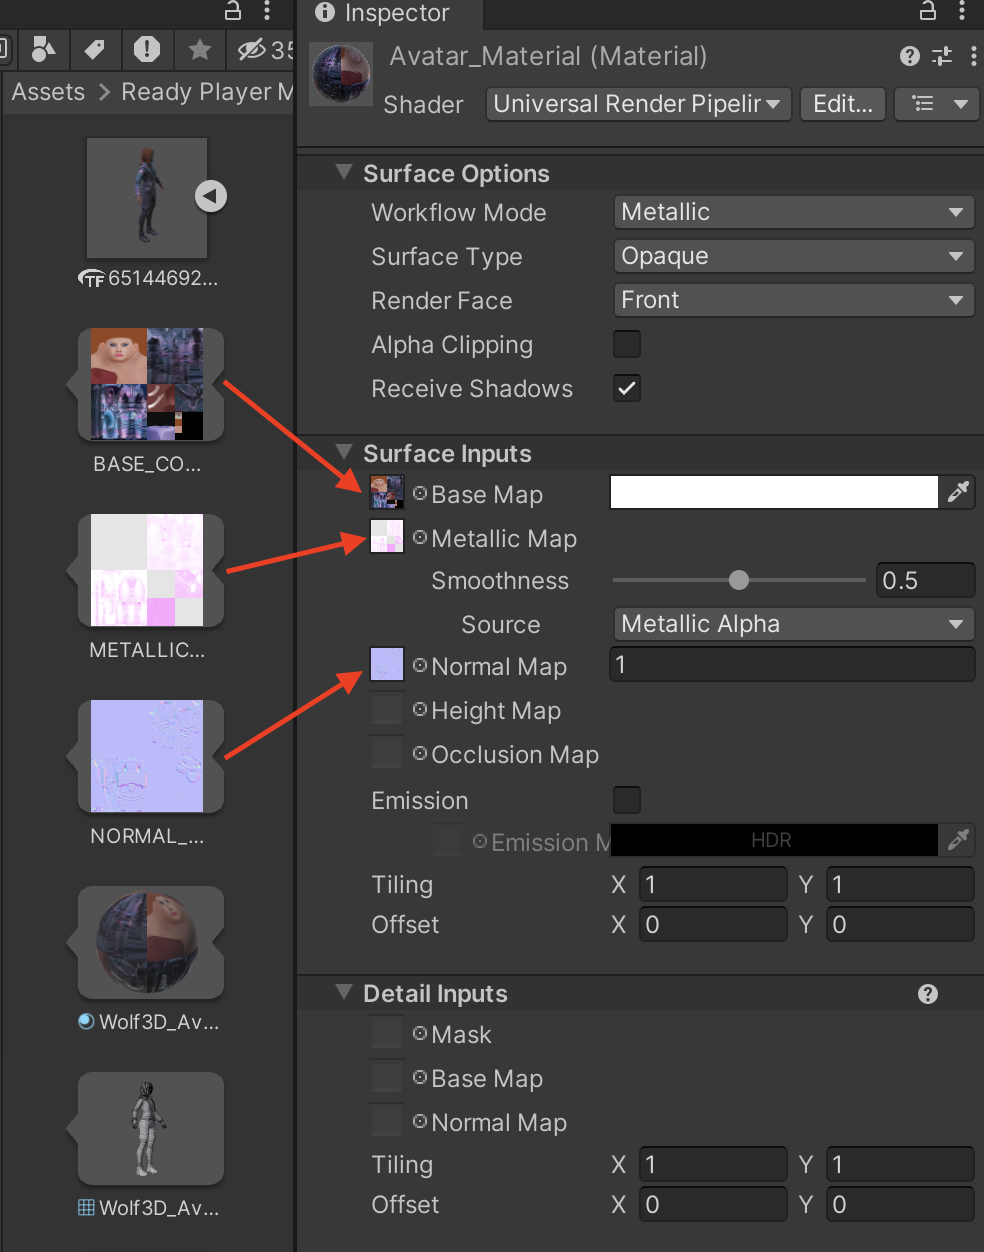
Assigning the textures to the Avatar URP Lit Material
One last step is to assign this material to our avatar object. Just select the avatar in the scene, unfold the hierarchy and find the child object Renderer_Avatar. Now, in the inspector, drag and drop the material we just set up, and this will update the avatar to use the new material.
Make sure to save this SampleScene scene. Now, our avatar is ready to be used for Vision Pro!
6. PolySpatial package installation
To be able to build our PolySpatial MR App, we first need to install the PolySpatial packages. As mentioned in the first requirements section, you need a Unity Pro license to access this package. You can get a 30-day trial by following the link mentioned in Section 1 (Requirements)..
In Unity, go to Window → Package Manager, click on the '+' button, select 'Add package by name,' and add the following packages one by one:
- com.unity.polyspatial.xr
- com.unity.polyspatial.visionos
- com.unity.polyspatial

Adding package by name into Package Manager
You might get a warning asking if you want to enable the backends. Go ahead and press 'Yes' in the confirmation dialog and wait for the editor to restart.

Warning during the package installation
After the restart is completed, repeat the process to add the two remaining packages. Once done, you should see the three packages listed on your packages list. Then, select the first package, PolySpatial, go to the Sample tab, and import both samples.
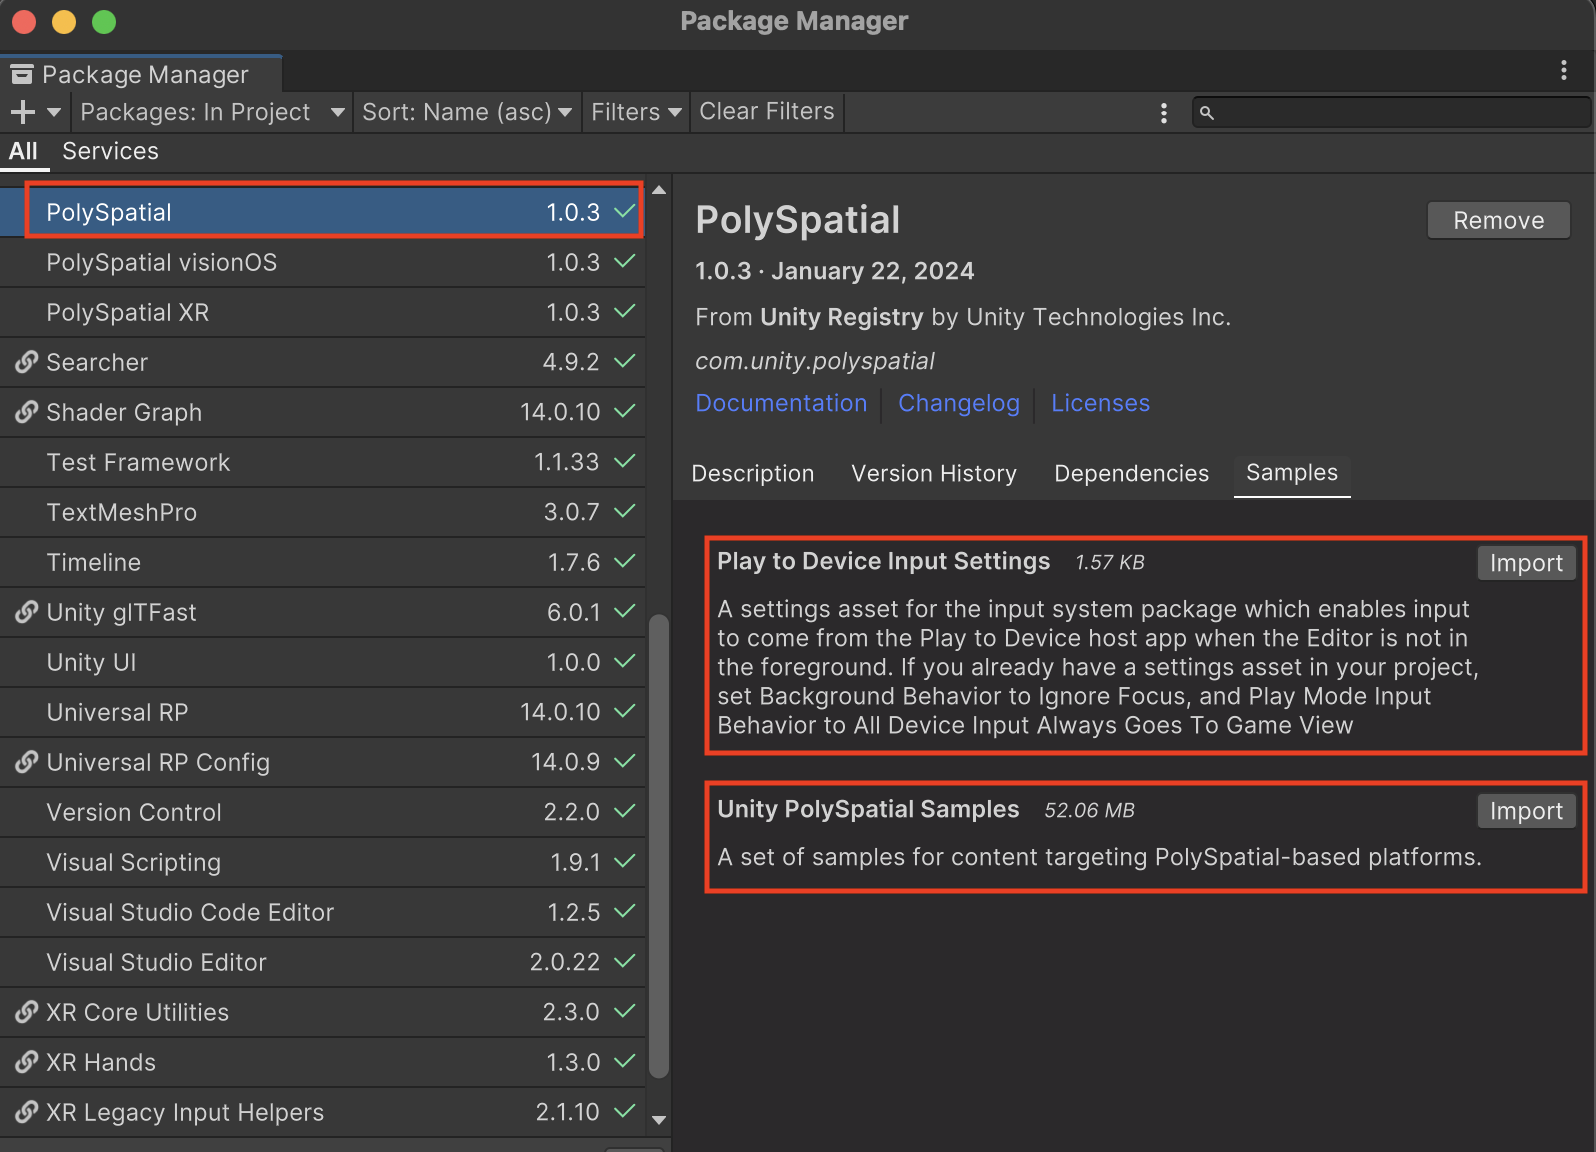
Importing PolySpatial Samples
You can use the first sample, 'Play to Device Input Settings,' later. If you wish to take advantage of the 'Play to Device' feature, allowing you to live preview your content across the Unity editor in the visionOS simulator or the Apple Vision Pro device, you can visit the Play to Device PolySpatial documentation page to learn more about how to use it. In this blog, we focus on exploring the Unity PolySpatial Samples to see examples of use cases using the PolySpatial Package.
If you would like to know more about what is supported and not supported so far with the PolySpatial package, you can visit the Supported Unity Features & Components page.
7. PolySpatial MR App modes and volumes
Apple introduced a new concept in XR software we mentioned earlier: volumes. An app can contain one or more volumes to display content in the mixed reality space. Think of a volume as a box that contains 3D content. In Unity, we can interact with these volumes using components called “Volume Camera.” These volumes can be:
- Bounded volumes: bounded volumes are finite, box-shaped extents. The 3D content fits within that specific bounded volume. We can have multiple volumes in one application. This mode, called Shared mode, allows multiple volumes in one application
- Unbounded volumes: the content presents a single unbounded volume without any clipping edges. The application owns the entire mixed reality view, with no other applications visible. Additional bounded volumes from the same application can coexist with this unbounded volume. This mode is called Exclusive mode.
Within the unbounded volume, an application can request access to multiple features, including full hand-tracking data through ARKit. However, this cannot be tested within the simulator.
8. Exploring PolySpatial Samples
Now, let’s look into the samples. You can find the scenes under Assets → Samples → PolySpatial → Scenes. In that folder, you can find different demos. When opening sample scenes that use TextMeshPro, you might receive a prompt to import it. Be sure to proceed with the import.
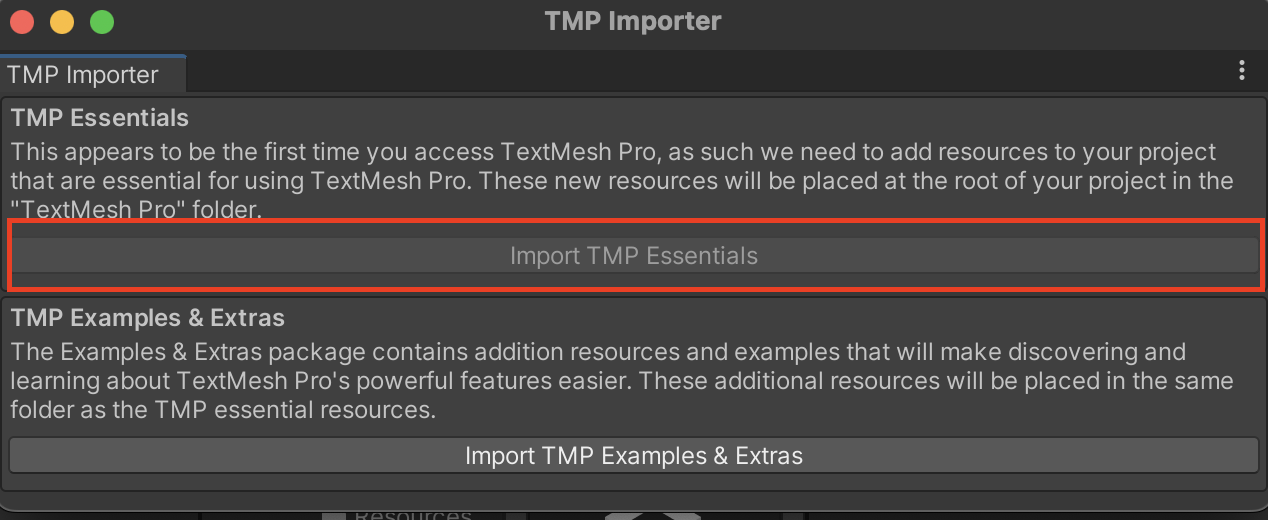
Importing TextMeshPro Essentials
Let’s start with the Manipulation scene. Double-click on the scene to open it, then find the Volume Camera object in the hierarchy. Select it, and in the inspector, you can visualize the Volume Camera Script Component attached to it.
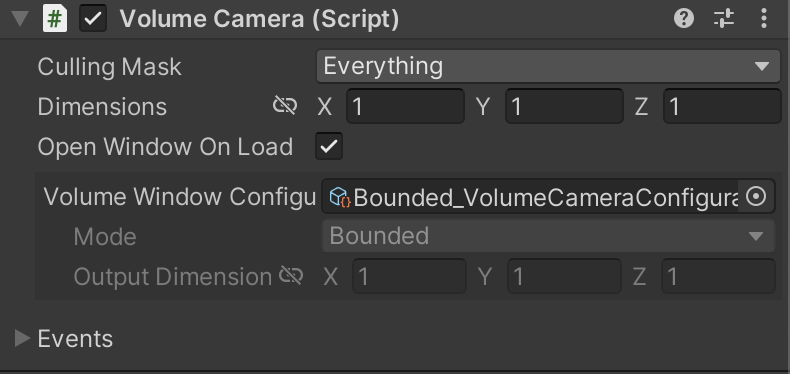
Volume Camera Component
In this sample scene, it is set to Bounded mode, which means that the dimensions property values will define how big the volume will be. Feel free to tweak the dimensions' property values and see the preview box adjusting the size accordingly.

Scene view with the Camera Volume preview
To switch to unbounded volume, all we have to do is change the Volume Window Configuration asset assigned to the Volume Camera Component. The samples come with two configuration assets for bounded and unbounded that can be found within the folder under Samples → Resources.
Now, let’s go to the Edit top menu and then choose Project Settings. Under XR-Plugin Management, select Apple visionOS and switch App mode to mixed reality. You can use the other different modes to test later if you want to have a windowed app or a fully Immersive app.
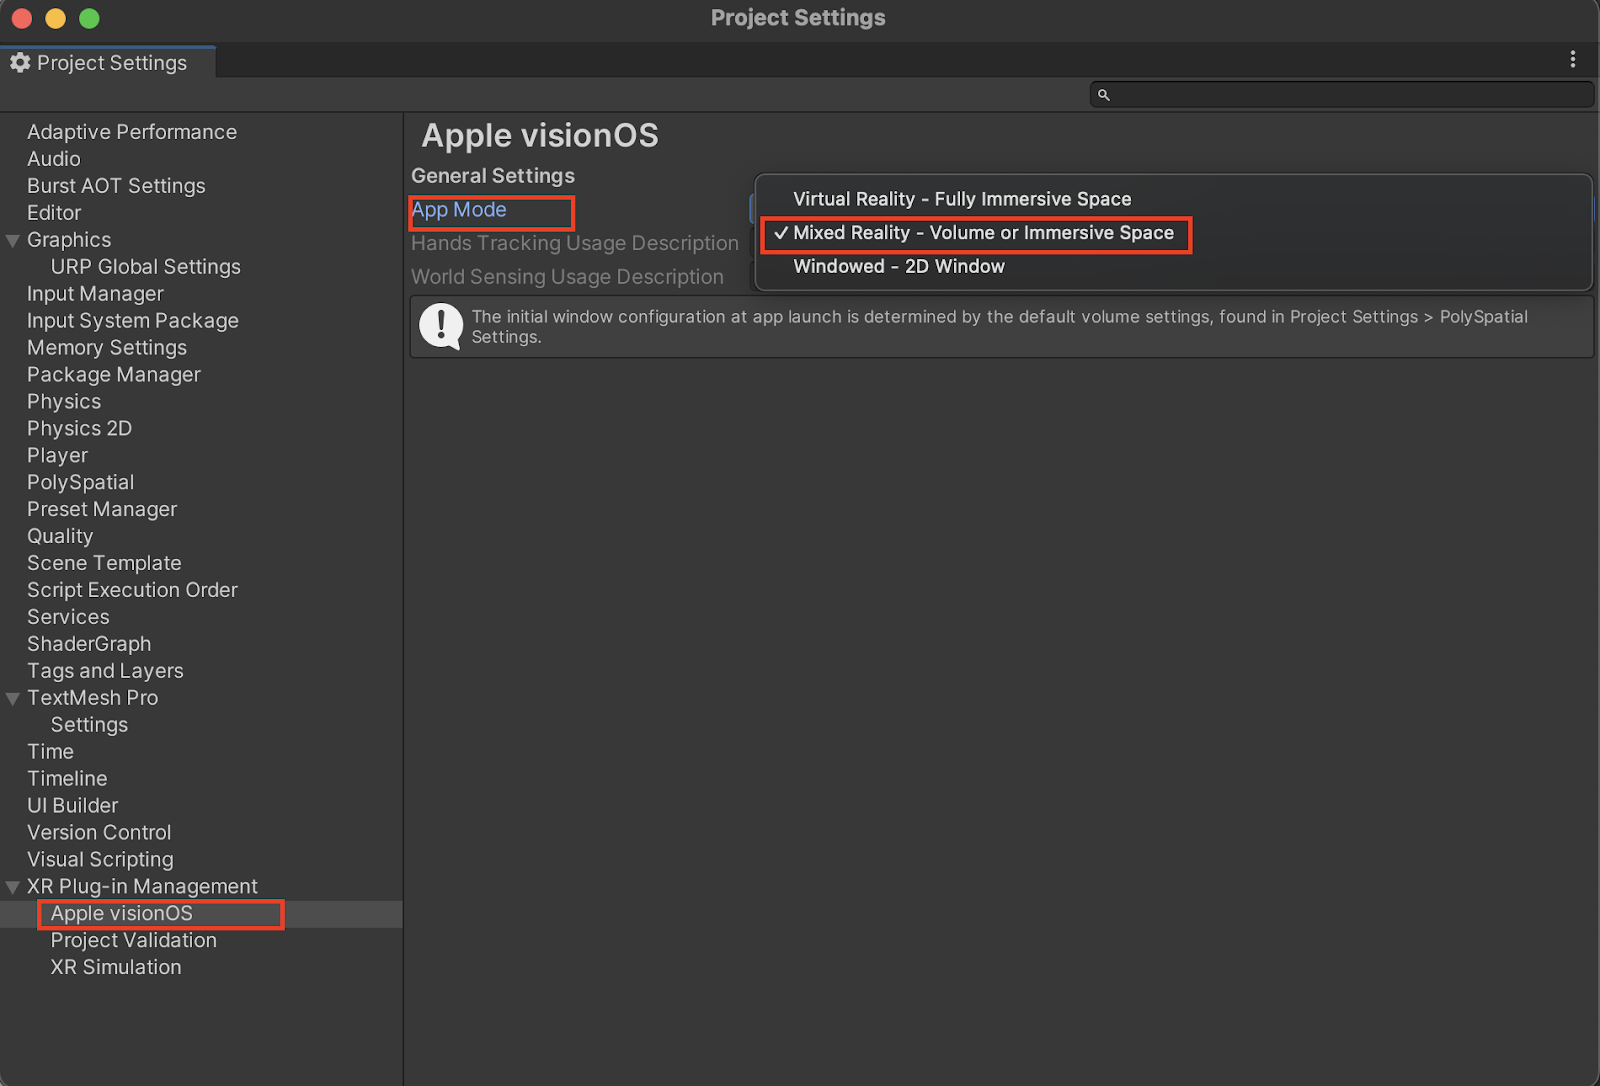
Configuring App Mode in Project Settings
Now, let’s close this window and open the Build Settings by going to the top menu File and then Build Settings. Drag and drop the currently open scene sample Manipulation into the Scenes to build, or simply click Add Open Scenes. Finally, click on the Build and Run button and choose the folder where you want to store your builds. You can create a new folder for this build.
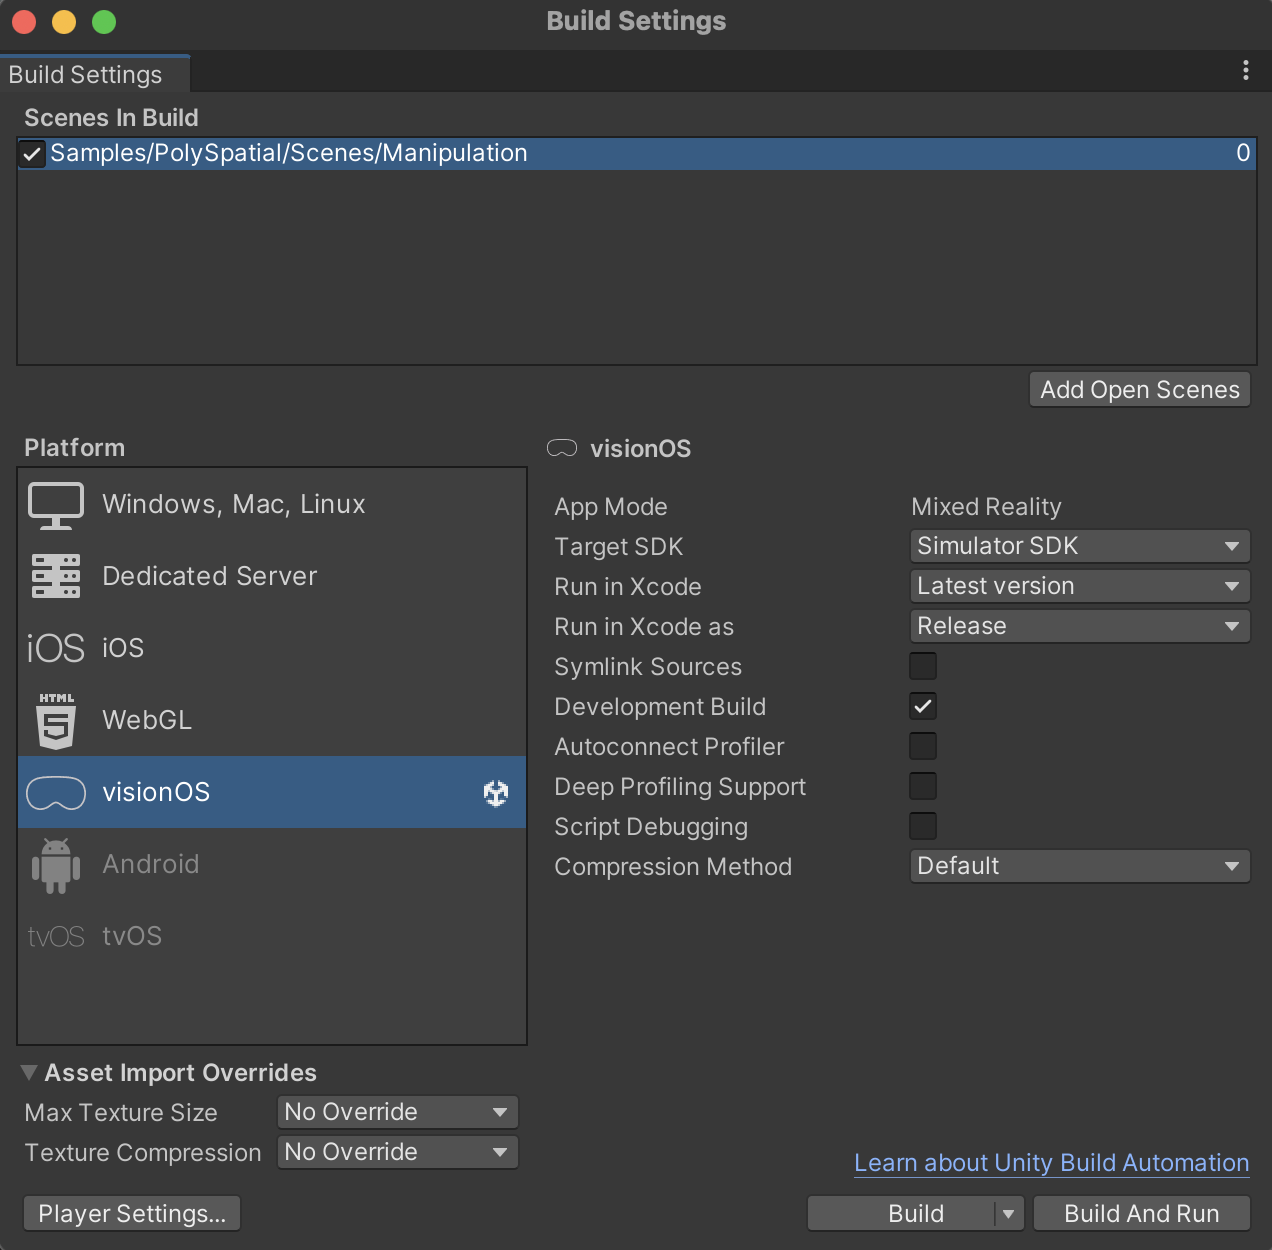
Adding scene to Scenes In Build
You may encounter this error message in the Unity console when building: “Microphone class is used, but Microphone Usage Description is empty in Player Settings.”
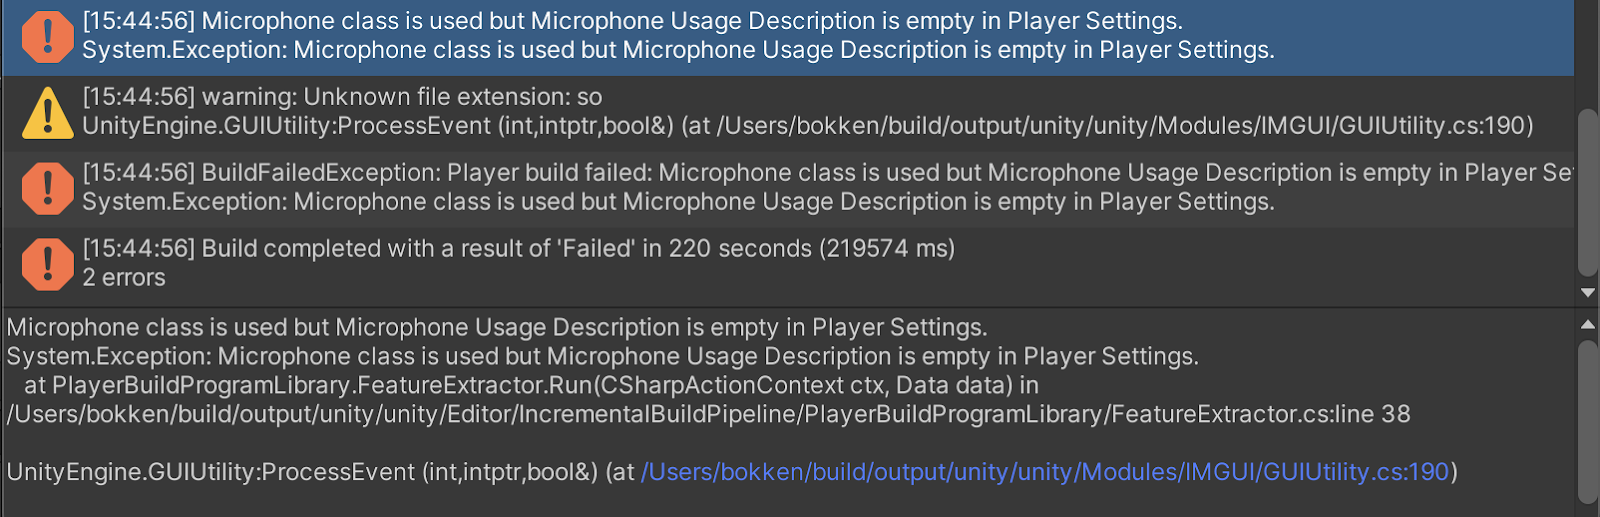
Microphone Usage Description error in the console
If you do, you can go to the Player Settings, which is accessible at the bottom left of the Build Settings window. The visionOS settings will be selected by default, and under Other Settings, find Microphone Usage Description and add ‘’use microphone’’ to the text field in front of the property. Then, save the project, click again on Build and Run.

Setting Microphone Usage Description field
When the application is about to run, you will be requested to allow Unity Hub to access the control Xcode. Make sure to click Allow.
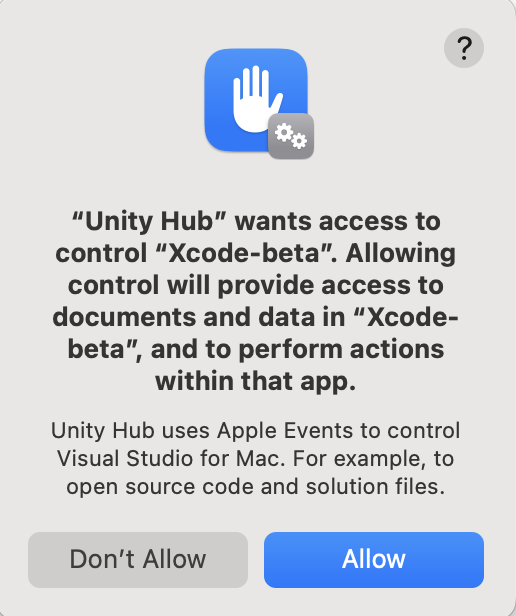
Unity Hub Xcode access request
Wait for the build to complete and the Apple Vision Pro simulator to launch, and then you should be able to see the application we just built loaded with the bounded volume. You can manipulate the cubes by drag-and-dropping them.
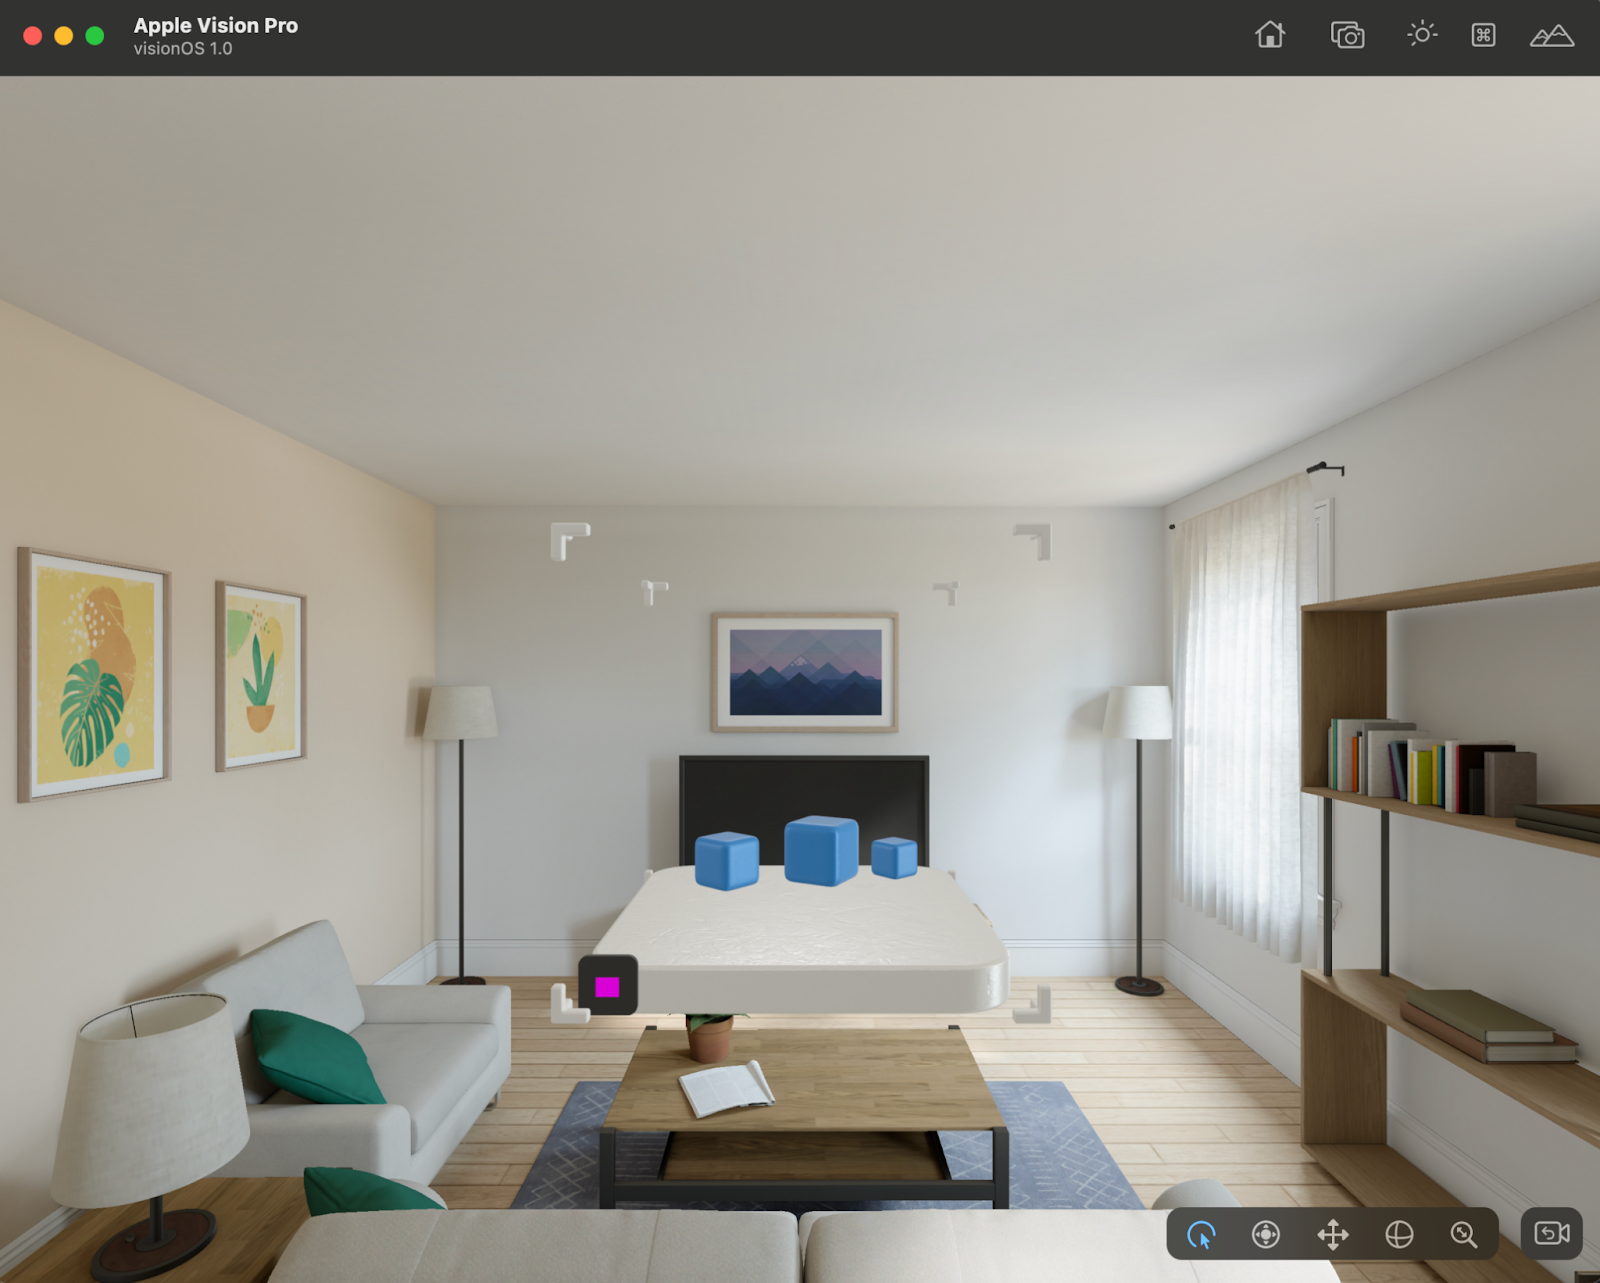
The application running in Apple Vision Pro Simulator
9. Creating PolySpatial MR App featuring Ready Player Me avatar
Now it’s time to bring in our Ready Player Me avatar. Go to the “SampleScene” where we imported the avatar earlier, select the avatar and copy it. Now, let’s find the “CharacterWalker” scene under Assets → Samples → PolySpatial → Scenes. Open it, and in the hierarchy, paste the avatar we copied. The avatar will show up bigger than the rest of the objects in the scene. Change the scale from 1 to 0.1 on x,y and z properties within the Transform Component in the Inspector. Set the position on the Y axis to “-0.2” and the rotation on the Y axis to 180. You will notice that the avatar overlaps with the Defaultperson object. This is fine, since the goal is to use our avatar to replace the old object.
In the hierarchy, select the DefaultPerson object, copy the Capsule Collider and Rigidbody components and paste them into the avatar gameobject.
Notice that the Ready Player Me avatar comes with an Animator component, so we only need to add the Controller from the DefaultPerson object to it. Click to find the Animator called StarterAssetsThirdPerson and select it to assign it. Now, we can Disable or remove the DefaultPerson object.

Avatar components set up
Find the Manager gameobject in the hierarchy and assign the avatar gameobject to both the Character Animator and Character Transform properties of the Character Input Manager script. Still, on the Manager gameobject, let’s also assign the avatar gameobject under the Character Transform property of the Camera Movement Behavior Script as well.
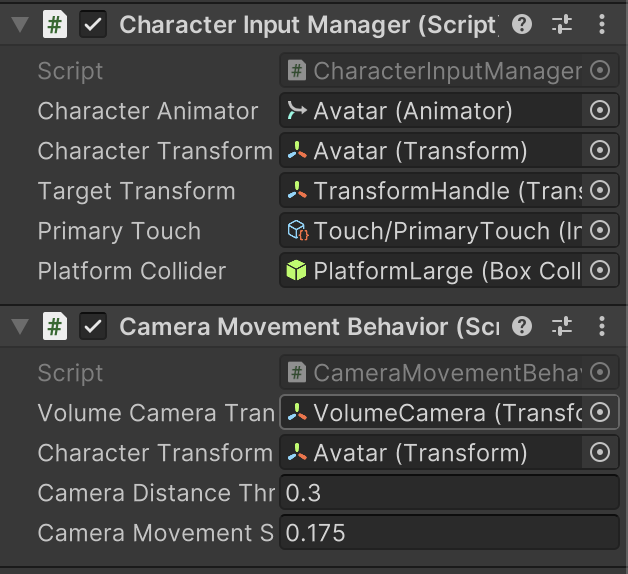
Manager gameobject script components
Finally, let’s go to File and select Build and Run. Wait for the build to complete and the simulator to launch, then we can see our avatar walking!
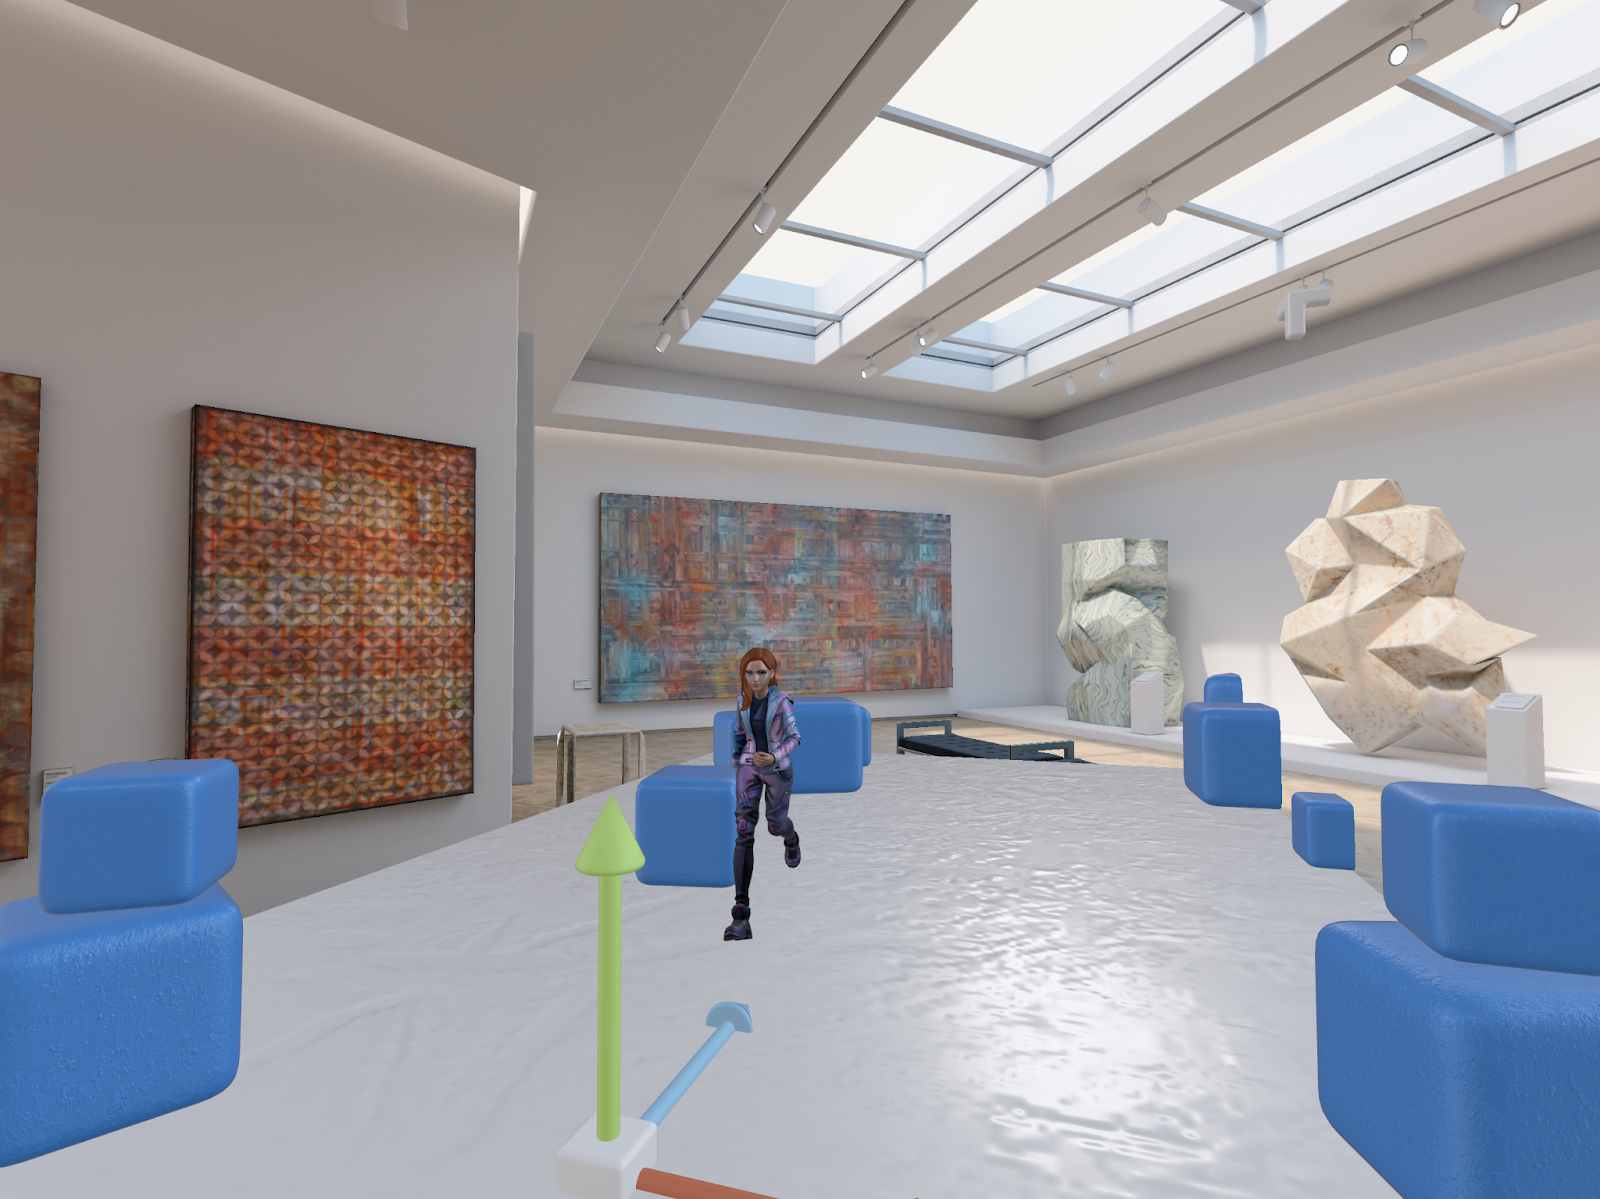
Ready Player Me avatar integrated on Unity PolySpatial demo visualized in the Vision Pro simulator
10. Sign up to access our new features and tools built for XR
We are continuously working on enhancing our avatars for XR platforms, including the cutting-edge visionOS. To stay updated on the latest avatar improvements and be among the first to access new features, sign up today.
Let us know in the Ready Player Me Developers Forum if you have any questions. We would love to hear about how you integrated the avatars into your project. And feel free to suggest other topics you would like us to cover in future blog posts.